James O'Neill's Blog

April 10, 2020

Transformers for PowerShell parameters which take secrets.

Filed under: Uncategorized — jamesone111 @ 11:17 am

PowerShell Functions often need to accept secure strings as or PowerShell credentials (which contain secure strings) as parameters.  There are people who will advise avoiding use of secure string completely, which isn’t really practical, but one shouldn’t credit Secure String with magic powers it doesn’t have.

  1. It is encoded so that your account on the current machine can decode it at will – any process running under your account can get to the secret.
  2. Another account, or your account on another machine can’t decode it. The main use is securing something in a file on one machine.
  3. In PowerShell 7 (but not PowerShell Core 6 or Windows PowerShell 5) the ConvertFrom-SecureString cmdlet has an -AsPlainText switch which gets the secret back. With older version the standard process is to create a credential object and then ask for the plaintext “network password”.
  4. It is only securing the credential at rest in the file. At some stage the plain text will be in memory (and malware can find it).

A script which looks like the following is obviously bad

$MyUserName = "James"

$MyPassword = ConvertTo-SecureString -force -asPlainText "NotVerySecret"

$Credential = New-Object PSCredential $myUserName,$MyPassword

Better to do

if (Test-path mycred.xml)  {

       $Credential = Import-Clixml myCred.xml

}

else {

       $Credential = Get-Credential

       $Credential | export-CliXML my.cred.xml

}

In the xml file you might see something like this

<Props>

<S N="UserName">james</S>

<SS N="Password">01000000d08c9ddf011 … 395d4060</SS>

</Props>

<S> Denotes a normal string and <ss> a long sequence of digits which become a secure string. There are ways use different keys, and DSC uses one of them to encrypt passwords when making putting them in a .MOF file, which service can then decode, but this simple method uses a personal, local key.

Credentials and secure strings are also useful for things like personal access tokens or API Keys where you might prefer not to save the plain text, but the commands which use them expect plain text here’s a simple case

Function Demo {

    [cmdletBinding()]

    param(

        [string]$ApiKey

    )

    "Your API key is $ApiKey"

}

Because [string] acts as “Convert what you are given to a string”, the function won’t refuse a secure string or a credential – it outputs

Your API key is System.Security.SecureString or Your API key is System.Management.Automation.PSCredential

My usual answer to this that $APIkey shouldn’t be typed and the body of the function should include a check the type of $APIKey and convert it as required; this approach has worked well for me as long as I have been doing PowerShell but there is an option to do it more elegantly.

One Question which came up on GitHub recently went like this:

Some commands take an API key use it as a plain text string so they have a string-typed parameter, but it would be useful to have a parameter attribute which allowed a string declared as a string to accept and convert credential or securestring objects.

PowerShell 5 and upwards can support argument transformers, and and the one below is named “UnSecureString”, it’s declared as an argument transformation attribute, with a single method, transform, which receives the parameter as “Input data” and returns an object. To work on version 5, it converts a credential to a password, and if it is given a secure string, it converts to it to a credential first.

class UnSecureString : System.Management.Automation.ArgumentTransformationAttribute  {

    [object] Transform([System.Management.Automation.EngineIntrinsics]$EngineIntrinsics, [object] $InputData) {

        if ($InputData -is [securestring]) {

            $InputData =  New-Object -TypeName System.Management.Automation.PSCredential -ArgumentList 'Placeholder', $InputData

        }

        if ($InputData -is  [pscredential]) {

            $InputData =  $InputData.GetNetworkCredential().password

        }

        return ($InputData)

    }

}


With this in place the parameter declaration in the function changes: 

Function Demo {

    [cmdletBinding()]

    param(

        [UnsecureString()] 
        [string]$ApiKey

    )

    "Your API key is $ApiKey"

}

And now it will take string, secure String, or credential

>demo "api12345key"

Your API key is api12345key

>$ss = ConvertTo-SecureString -AsPlainText "api34567key" -Force

>demo $ss

Your API key is api34567key

>$cred = New-Object pscredential "NoRealName", $ss

>demo $cred

Your API key is api34567key

It’s a debatable whether the parameter should still be typed in this case. In another github discussion, someone said they didn’t like to leave the untyped because on-line help shows parameter types and leaving them as the default, [object] skipped a chance to guide the user to provide the right thing. Since PowerShell lets us specify full paths and relative paths as strings, path info objects, or file info objects to identify a file we want to work on, I’ve always tried to accept make a “-Widget” parameter accept a unique widget ID, a Widget Name (possibly with wildcards), or one or more Object(s), the user shouldn’t need to care and I will write help explaining the three options. Without the help I’d be making the user guess.  The help for this example steers the user towards providing a plain text string

NAME

    Demo

   
SYNTAX

    Demo [[-ApiKey] <string>]

My preference is more towards removing the type and assuming the user will read more of the help, but I don’t think these things are absolutes. As supporting older versions of PowerShell becomes less of an issue, using classes and shifting the “first make sure this is the right kind of thing” code can simplify the function body, which is a plus. 
There is a case for changing the parameter type to secure string and having a transformer which turns plain strings to secure ones. But that can lead to writing

Demo –apikey (convertTo-SecureString ….) ,  
which is the horrible insecure method I showed at the start but more annoying to a user – especially if they look inside the function and see the first thing that happens is the secure string is converted back an placed in a request body. Examples should never show that, but should be based on the secure string coming from a file.

April 2, 2020

Including PowerShell classes in modules: a quick round-up

Filed under: Powershell,Uncategorized — jamesone111 @ 5:47 pm
Tags: , ,

Recently I have been adding PowerShell classes to modules and this post is what I’ve learned about where the class code should be located and how different ways of loading it have odd looking side effects. At some point I’ll make a list of people who should get some credit for educating me, because I would not have discovered all of it on my one.

From the start PowerShell has been able to use the Add-Type command to compile a type written in C# (or visual basic) and load it into the PowerShell session like any other class. Windows PowerShell 5 added the ability to code classes in PowerShell and there’s little if any change version 6 and 7. However there are some quite unusual behaviours when they are used in modules, and which don’t seem well documented. The following applies to the classes written in PowerShell (not the ones loaded with Add-Type)

  1. A PowerShell class is only visible outside its own module if either.

    a. It is loaded in the PSM1 file (not dot sourced into the PSM1) AND the module is loaded with the using module directive. OR

    b. It is loaded from a PS1 file using the ScriptsToProcess section of the PSD1 manifest.

  2. If a module is loaded by a script which specifies Using module, classes from its PSM1 are only visible in the script’s scope (inside a ps1, unless the file is Dot sourced.)

    The same scope issues/rules apply if the class is loaded from ScriptsToProcess and the module is loaded with Import-module

  3. If a class used as a parameter attribute in a function is not visible in the scope where that function is called it cannot be abbreviated by dropping the Attribute from its name.

    In other words, a parameter attribute which has been shortened from [ValidateWibbleAttribute()] to [ValidateWibble ()] may cause failures if the module is loaded in the wrong way. [2] above should make it clear that sooner or later any module will be loaded the wrong way.

Based on this

  1. My view of a .PSM1 file as a small “loader” – which I think is a common one – needs to at least be revised enough to allow for Classes to be included in it.

    I’m still not keen on having everything in the PSM1 and will probably continue to keep functions in their own PS1 files, but functions can be successfully dot sourced into the PSM1 and classes cannot.
  2. Using module X is preferable to Import-Module X, where the module has some requirement which means it won’t run on legacy Windows PowerShell.

    In other words,V4 and earlier are still out in the field – and for modules which work with those versions you might prefer import to using. However V4 won’t import a module with classes so with modules which need V5/6/7 sticking to Import-Module doesn’t gain anything and makes classes invisible

  3. I’m no longer trimming ‘attribute’ off the names of parameter attribute class names when declaring parameters. I’m not sure at the moment if there is any reason to use attribute in the class name (it appears not).

December 31, 2019

Parameters and putting the data in the data.

Filed under: Powershell — jamesone111 @ 8:27 pm

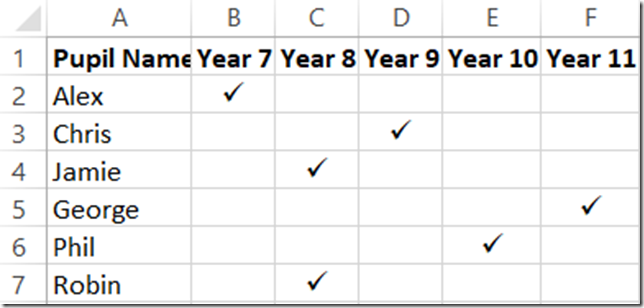
imageIn the last post said my IT career began in the Mesolithic era ; a recent discussion reminded me of something from my days as an expert in SharePoint Portal Server and a talk I gave back in 2002 which would be the Neolithic. Back then I tried to explain don’t put data in field name :  back then I was talking about document metadata but it applies anywhere

In the example on the left, each possible value for a single “which year are you in” has become its own yes/no question. “Are you in Year 7”, then “are you in year 8” … it makes it awkward to ask for pupils younger than X and so on it’s just not a very good way. If multi-value fields are an option it is much better to have one for “Subjects”, not separate tick boxes for “French”, “Geography”, “History”. But we do see skills databases with a column for every skill. And so on.

The PowerShell angle came about in a discussion about how parameter sets should behave. The person I was talking to had a fragment of script which looked roughly like the following pseudo-code

function Send-Message {
  param(
    [string] $Message,
    [Parameter(ParameterSetName = 'High')] [switch]$HighPriority,
    [Parameter(ParameterSetName = 'Low')]  [switch]$LowPriority
  )   
  $Priority = 1
  if     ($HighPriority) { $Priority ++ }
  elseif ($LowPriority)  { $Priority -- }

  Invoke-sender $message $Priority   
}

His complaint was that PowerShell does not deduce that the script should run with neither HighPriority nor LowPriority. (Because he has a Normal priority which works if neither is specified) and to avoid a message Parameter set cannot be resolved using the specified named parameters he needs to either specify a default set, or say that one of the two parameters is mandatory.
Of course when a language has this sort of behaviour some people come rely on it: if the options were “ID” and “Name” and providing neither meant some action would change all items without filtering by either, a parameter resolution error is the only thing standing between a mistyped command and disaster.   

Experienced programmers / scripters will know that code sometimes grows in this way: first it has
[switch]$HighPriority  
giving “ordinary” behaviour (send at priority of 1) and switch to invoke “special mode” and run extra code (raising priority to 2). All is as it should be.
Then someone says “we should support low priority” and the parameters become
[switch]$HighPriority 
[switch]$LowPriority 
This means any existing scripts can retain –HighPriority. But things are already going wrong. We no longer have “Special” and “Ordinary”, selected by one switch (two choices), but priority 1,2 or 0 selected using two switches (four choices) “Both” is a nonsensical option so to prevent the user setting both, the parameters become
[Parameter(ParameterSetName = 'High')] [switch]$HighPriority,    
[Parameter(ParameterSetName = 'Low')]  [switch]$LowPriority

At this point PowerShell doesn’t know there should be a third option. Both parameters are required in their respective sets but neither is marked as mandatory. If HighPriority were mandatory, PowerShell would interpret neither to be the “Low” set with its optional parameter omitted. If a set can’t be used without a parameter, that parameter really should be mandatory, but when a set has a single parameter specifying the parameter selects the set. Keeping one set with everything optional allows that set to be selected as a default if nothing can be inferred from the parameters which are there.  
I think it is better style to declare a third set, with no members of its own, to be the default. The extra set or the the “defaultable” set both side step the error when high and low are omitted, but they don’t make it clear that that results in a valid, safe, priority of 1. It is better to collapse the two switches into one parameter which can take any of the three values with a default, like this.

function Send-Message {
  param(
    [string] $Message,
    [ValidateSet('Normal','High','Low')]$Priority = 'High'
    )    
  Switch ($Priority) {
    "Low"   {Invoke-Sender $message 0 }
    "High"  {Invoke-Sender $message 2 }
    default {Invoke-Sender $message 1 }
  }
}

High, Medium and Low will tab complete, making it obvious to the user that there are 3 choices, and it is equally obvious to someone maintaining the code. There’s no need to worry about parameter-sets, and the code is shorter. The following will keep the –HighPriority switch if existing scripts are using it:
  [parameter(DontShow)]
  [switch]$HighPriority

Marking a parameter as don’t show hides it in tab completion – useful for a deprecated option.  If it is specified and the priority is not, then Priority can be set accordingly.
  if (-not $PSBoundParameters.ContainsKey("Priority") -and $Highpriority) {
    $Priority = "High"
  }
      

While I was a drafting this post I came across Adam Driscoll’s Selenium module which had an example which takes this problem up a level. I started work on supporting Selenium from PowerShell back in 2013/14 and when I dug some work out of my archive I found I had done near enough the same thing– it’s the natural way for the code to evolve, so don’t go inferring that this is (to borrow a phrase) “[to point out] how the strong man stumbles, or where the doer of deeds could have done them better.”  Selenium is a test framework for loading web pages into a browser and checking their content and there are multiple ways to specify how an element should be found on the page (by ID, By XPath and so on), so you need to say find this which is an ID, or find that which is a class name and so on. Adams’s code covers more options than my old version did and the param block looks like this:


  [Parameter(ParameterSetName = "ByCss")]
  $Css,
  [Parameter(ParameterSetName = "ByName")]
  $Name,
  [Parameter(ParameterSetName = "ById")]
  $Id,
  [Parameter(ParameterSetName = "ByClassName")]
  $ClassName,
  [Parameter(ParameterSetName = "ByLinkText")]
  $LinkText,
  [Parameter(ParameterSetName = "ByPartialLinkText")]
  $PartialLinkText,
  [Parameter(ParameterSetName = "ByTagName")]
  $TagName,
  [Parameter(ParameterSetName = "ByXPath")]
  $XPath

All legal and valid. There are 8 parameter sets – if we needed to segment on something else it would become 16 or 24 or 32 sets. In the body of the function there is

  if ($PSCmdlet.ParameterSetName -eq "ByName") {
      $Target.FindElements([OpenQA.Selenium.By]::Name($Name))
  }

  if ($PSCmdlet.ParameterSetName -eq "ById") {
      $Target.FindElements([OpenQA.Selenium.By]::Id($Id))
  }

And this repeats for each parameter set. Using the logic I’ve already talked about I reduced the parameters to two

  [ValidateSet("CssSelector", "Name", "Id", "ClassName", "LinkText", "PartialLinkText", "TagName", "XPath")]
  [string]$By = "XPath",

  [Alias("Name", "Id", "ClassName","LinkText", "PartialLinkText", "TagName","XPath")]
  [Parameter(Position=1,Mandatory=$true)]
  [string]$Selection,

The old syntax of –XPath "something" has become –By Xpath –selection "something" or –By Xpath "something" (because “something” will be assumed to be selection or) simply "something" (because –By defaults to "Xpath".) and the main part of the code becomes one line

$Target.FindElements([OpenQA.Selenium.By]::$By($Selection))

The static method is selected using a parameter value, which is validated to be one of the allowed methods; and the value passed to the method always comes from the same parameter.
But this won’t (yet) work with the original syntax. However because -By isn’t mandatory,and I have created aliases for the new selection parameter using the “lost” names the new version can still be called with  -xpath “Something” It needs a little extra code (which appears below) to recognise that has happened and set $By to the right value. First it finds the name which was used to call the function (it might be an alias, or the function might be renamed), then if the –By hasn’t been supplied and the command line reads “InvocationName  <<anything except ‘>’, `|’ or ‘;’>> –ParameterAlias” it captures the parameter alias and puts it into $by

  $mi = $MyInvocation.InvocationName
  if(-not $PSBoundParameters.ContainsKey("By") -and
        ($MyInvocation.Line -match  "$mi[^>\|;]*-(Name|Id|ClassName|LinkText|PartialLinkText|TagName|XPath)")) {
    $By = $Matches[1]
  }

Net, I shortened the function by about 60 lines, and with this flourish, kept it compatible.

November 24, 2019

Redefining CD in PowerShell

Filed under: Powershell — jamesone111 @ 6:48 pm

For some people my IT career must seem to have begun in Mesolithic times – back then we had a product called Novell Netware (and Yorkshiremen of a certain age will say “Aye, and Rickets and Diphtheria too”). But I was thinking about one of of Netware’s features recently; well as the traditional cd .. for the parent directory Netware users could refer to two levels up as … , three levels up as …. and so on. And after a PowerShell session going up and down a directory tree I got nostalgic for that. And I thought…

  • I can convert some number of dots into a repetition of “..\” fairly easily with regular expressions.
  • I’ve recently written a blog post about argument transformers and
  • I already change cd in my profile, so why not change it a little more ?

By default, PowerShell defines CD as an alias for SET-Location and for most of the time I have been working with PowerShell I have set cd- as an alias for POP-Location, deleted the initial cd alias (until PowerShell 6 there was no Remove-Alias cmdlet, so this meant using Remove-Item Alias:\cd –force) and created a new alias from cd to PUSH-location , so I can use cd in the normal way but I have cd- to re-trace my steps.
To get the exta functionality means attaching and Argument transformer to the parameter where it is declared, so I would have to make “new cd” a function instead of an alias. The basic part of it looks like this:-

function cd {
    <#
.ForwardHelpTargetName Microsoft.PowerShell.Management\Push-Location
.ForwardHelpCategory Cmdlet
#>

    [CmdletBinding(DefaultParameterSetName='Path')]
    param(
        [Parameter(ParameterSetName='Path', Position=0,
             ValueFromPipeline=$true, ValueFromPipelineByPropertyName=$true)]
        [PathTransform()]
        [string]$path
    )
    process {
        Push-Location @PSBoundParameters
    }

}

The finished item (posted here) has more parameters – it is built like a proxy function, it forwards help to Push-Location’s  help. If the path is “”(or a sequence of – signs) to Pop-Location  is called for each “–”, so I can use a bash-style to cd  - as well as cd-  and Push-Location  is only called if a path is specified.
If the path isn’t valid I don’t want the error to say it occurred at a location in the function so I added a validate script to the parameter.

The key piece is the [PathTransform()] attribute on the path Parameter – it comes from a class, with a name ending “attribute” (which can be omitted when writing the parameter attribute in the function). Initially the class was mostly wrapping around one line of code

class PathTransformAttribute : System.Management.Automation.ArgumentTransformationAttribute {
    [object] Transform([System.Management.Automation.EngineIntrinsics]$EngineIntrinsics,
                       [object] $InputData)
     {
        return $InputData -replace "(?<=^\.[./\\]*)(?=\.{2,}(/|\\|$))"  ,  ".\"
    }
}

The class line defines the name and says it descends from the ArgumentTransformationAttribute class;
the next line says it has a Transform method which returns an object, and takes parameters EngineIntrinsics, and InputData
and the line which does the works a is regular expression. In Regex:
(?<=AAA)(?=ZZZ)
says find the part of the text where looking behind you, you see AAA and looking ahead, you see ZZZ; this doesn’t specify anything to select between the two, so “replacing” it doesn’t remove anything it is just “insert where…”.  In the code above, the look-behind part says ‘the start of the text “(^”), a dot (“\.”), and then dots, forward or back slashes (“[./\\]”) repeated zero or more times (“*”) ’ ;  and the look ahead says ‘a dot (“\.”) repeated at least 2 times (“{2,}”) followed by / or \ or the end of the text (“/|\\|$”).
So names like readme…txt won’t match, neither will …git but …\.git will become ..\..\.git. .

BUT …[tab] and doesn’t expand two levels up – the parameter needs an argument completer for that. Completers take information about the command line  – and especially the current word to complete and return CompletionResult objects for tab expansion to suggest.
PowerShell has 5 ready-made completers for Command, Filename, Operator, Type and Variable. Pass any of these completers a word-to-complete and it returns  CompletionResult objects – for example you can try
[System.Management.Automation.CompletionCompleters]::CompleteOperator("-n")

A simple way to use for one of these is to view help in its own window, a feature which is returning in PowerShell 7 (starting in preview 6); I  like this enough to have a little function, Show-Help which calls  Get-Help –ShowWindow. Adding an argument completer my function’s command parameter means it tab-completes matching commands.

function Show-Help {
  param (
    [parameter(ValueFromPipeline=$true)]
    [ArgumentCompleter({
        param($commandName, $parameterName,$wordToComplete,$commandAst,$fakeBoundParameter)
        [System.Management.Automation.CompletionCompleters]::CompleteCommand($wordToComplete)
    })]
    $Command
  )
  process {foreach ($c in $Command) {Get-Help -ShowWindow $c} }

}

The completer for Path in my new cd needs more work and there was a complication which took little while to discover: PSReadline caches alias parameters and their associated completers so after the cd alias is replaced my profile I need to have this:

if (Get-Module PSReadLine) {
    Remove-Module -Force PsReadline
    Import-Module -Force PSReadLine
    Set-PSReadlineOption -BellStyle None
    Set-PSReadlineOption -EditMode Windows
}

You might have other psreadline options to set.
I figured that I might want to use my new completer logic in more than one command, and I also prefer to keep anything lengthy scripts out of the Param() block, which led me to use an argument completer class. The outline of my class appears below:

class PathCompleter : System.Management.Automation.IArgumentCompleter {
    [System.Collections.Generic.IEnumerable[ System.Management.Automation.CompletionResult]] CompleteArgument(
                   [string]$CommandName,
                   [string]$ParameterName,
                   [string]$WordToComplete,
                   [System.Management.Automation.Language.CommandAst]$CommandAst,
                   [System.Collections.IDictionary] $FakeBoundParameters
    )
    {
        $CompletionResults = [System.Collections.Generic.List[ System.Management.Automation.CompletionResult]]::new()

        # populate $wtc from $WordToComplete

foreach
($result in
           [System.Management.Automation.CompletionCompleters]::CompleteFilename($wtc) ) {
             if ($result.resultType -eq "ProviderContainer") {$CompletionResults.Add($result)}
        }
        return $CompletionResults
    }
}

The class line names the class and says it implements the IArgumentCompleter interface, Everything else defines the class’s CompleteArgument method, which returns a collection of completion results, and takes the standard parameters for a completer (seen here). The body of the method creates the collection of results as its first line and returns that collection as its last line, in-between it calls the CompleteFileName method I mentioned earlier, filtering the results to containers. The final version uses the CommandName  parameter to filter results for some commands and return everything for others. Between initializing $CompletionResults and the foreach loop is something to convert the WordToComplete  parameter into the $wtc argument passed to CompleteFileName

The initial idea was to expand 3, 4, or more dots. But I found ..[tab] .[tab] and ~[tab] do not expand – they all need a trailing \ or /.  “I can fix that” I thought…
Then I thought “Wouldn’t it be could if I could find a directory somewhere on my current path” so if I’m in a sub-sub-sub-folder of Documents  \*doc [tab] will expand to documents.
What about getting back to the PowerShell directory ? I decided ^[tab] should get me there.
Previously pushed locations on the stack? It would be nice if I could tab expand “-“ but PowerShell takes that to be the start of a parameter name, not a value so I use = instead =[tab] will cycle through locations == [tab] gives 2nd entry on the stack ===[tab] the third and so on.  There aren’t many characters to choose from; “.” and all the alphanumerics are used in file names; #$@-><;,| and all the quote and bracket characters tell PowerShell about what comes next. \ and / both mean “root directory”, ? and * are wild cards, ~ is the home directory. Which leaves !£%^_+ and = as available (on a UK keyboard), and = has the advantage of not needing shift. And I’m sure some people use ^ and or = at the start of file names  – they’d need to change my selections.

All the new things to be handled go into one regular-expression based switch statement as seen below; the regexes are not the easiest to read because so many of characters need to be escaped. “\\\*” translates as \ followed by * and “^\^” means “beginning with a ^”  and the result looks like some weird ascii art.

$dots    = [regex]"^\.\.(\.*)(\\|$|/)" 
$sep     = [system.io.path]::DirectorySeparatorChar
$wtc     = ""
switch -regex ($wordToComplete) {
    $dots       {$newPath = "..$Sep" * (1 + $dots.Matches($wordToComplete)[0].Groups[1].Length)
                         $wtc = $dots.Replace($wordtocomplete,$newPath) ; continue }
    "^=$"       { foreach ($stackPath in (Get-Location -Stack).ToArray().Path) {
                    if ($stackpath -match "[ ']") {$stackpath = '"' + $stackPath + '"'}
                    $results.Add([System.Management.Automation.CompletionResult]::new($stackPath))
                    }
                    return $results ; continue
                }
    "^=+$"      {$wtc = (Get-Location -Stack).ToArray()[$wordToComplete.Length -1].Path  ; continue }
    "^\\\*|/\*" {$wtc = $pwd.path -replace "^(.*$($WordToComplete.substring(2)).*?)[/\\].*$",'$1' ; continue }
    "^~$"       {$wtc = $env:USERPROFILE  ; continue }
    "^\^$"      {$wtc = $PSScriptRoot     ; continue }  
    "^\.$"
      {$wtc = ""                ; continue }  
    default
     {$wtc = $wordToComplete}
}

Working up from the bottom,

  • The default is to use the parameter as passed in CompleteFileName. Every other branch of the switch uses continue to jump out without looking at the remaining options.
  • if the parameter is “.”, ”^” or “~” CompleteFileName will be told use an empty string, the script directory or the user’s home directory respectively. ($env:userProfile is only, set on Windows by default. Earlier in my profile I have something to set it to [Environment]::GetFolderPath([Environment+SpecialFolder]::UserProfile) if it is missing, and this will return the home directory regardless of OS)
  • if the  parameter begins with \* or begins with /* the script takes the current directory, and selects from the beginning to whatever comes after the * in the parameter, and continues selecting up to the next / or \ and discards the rest. The result is passed into completeFileName
  • If the parameter contains a sequence of = signs and nothing else, a result is returned which from the stack, = is position 0, == is position 1 using the length of the parameter
  • If the parameter is a single = sign the function returns without calling Completefilename . It looks at each item on the stack in turn, those which contain either a space or a single quote, are wrapped in double quotes before being added to $results, which is returned at the end is returned.
  • And the first section of the switch uses an existing regex object as the regular expression. The regex object will get the sequence of dots before the last two, and repeats “..\”  as many times as there are dots, and drops that into $WordToComplete . PowerShell is quite happy to use / on windows where \ would be normal, and to use \ on Linux where / would be normal. Instead of hard coding one I get the “normal” one as $sep and insert that with the two dots.

Adding support for = and ^ meant going back to the argument transformer and adding the option so that cd ^ [Enter] and cd = [Enter] work

I’ve put the code here and a summary of what I’ve enabled appears below.

Keys


Before


After
cd ~[Tab] – (needs ~\) Expands
cd ~[Enter] Set-Location Push-Location
cd ..[Tab] – (needs ..\) Expands <Parent>
cd ..[Enter] Set-Location Push-Location
cd …[Tab] Expands
and higher levels with each extra “.”
cd …[Enter] ERROR Push-Location
& beyond with each extra “.”
cd /*pow [Tab] Expand directory/ directories above containing “pow”
cd /*pow [Enter] ERROR Push-location to directory containing “pow”
(if unique; error if not unique)
cd ^[Tab] Expands PS Profile directory
cd ^[Enter] ERROR Push-Location PS Profile directory
cd =[Tab] Cycle through location stack
cd =[Enter] ERROR Push-location to nth on stack:
= is 1st, == 2ndetc
(and allow ‘Pop’ back to current location)
cd -[Enter] ERROR Pop-location (repeats Pop for each extra – except for 2– which suffers from a bug)
Does not allow Pop back to current location
cd- [Enter] ERROR Pop-location
cd\ [Enter] Set-Location \ Push Location \
cd.. [Enter] Set-Location .. Push-location ..
cd~ [Enter] ERROR Push-Location ~


November 10, 2019

PowerShell Arrays, performance and [not] sweating the small stuff

Filed under: Powershell — jamesone111 @ 12:22 pm

I’ve read a couple of posts on arrays recently Anthony (a.k.a. the POSH Wolf) posted one and Tobias had another. To their advice I’d add Avoid creating huge arrays, where practical.  I’ve written about the problems doing “Is X in the set” with large arrays; hash-tables were a better answer in that case. Sometimes we can avoid storing a big lump of data altogether, and I often prefer designs which do. 

We often know this technique is “better” than that one, but we also want code which takes a short time-to-write; is clear so that later it has a short time-to-understand , but doesn’t take an excessive time-to-run. As with most of these triangles, you can often get two and rarely get all three. Spending 30 seconds writing something which takes 2 seconds to run might beat something which takes 10 minutes to write and runs in 50 milliseconds. But neither is any good if next week we spend hours figuring out how the data was changed last Tuesday.   

Clarity and speed aren’t mutually exclusive, but sometimes there is a clear, familiar way which doesn’t scale up and a less attractive technique which does. Writing something which scales to "bicycle" will hit trouble when the problem reaches "Jumbo Jet" size, and applying "Jumbo" techniques to a "bike" size problem can be an unnecessary burden. And (of course) expertise is knowing both the techniques and where they work (and don’t).

One particular aspect of arrays in PowerShell causes a problem at large scale. Building up large arrays one member at a time is something to try to design out, but sometimes it is the most (or only) practical way. PowerShell arrays are created as a fixed size; adding a member means creating a new array, and copying the existing array and one more member to a new array gets slower as the array gets bigger. If the time to do each of n operations depends on the number done so far, which is 0 at the start, n at the end and averages n/2 during the process, the average time per item is some_constant * n/2. Let’s define k as 2* the constant, so average time per item is kn  and time to do all n items is  kn². The time rises with an exponent of n. People like to say “rises exponentially” for “fast” but this is exponential. You can try this test, the result from my computer appears below. The numbers don’t perfectly fit a square law, but the orders of magnitude do. 

$hash=[ordered]@{}    
foreach ($size in 100,1000,10000,100000) {
  $hash["$size"]=(measure-command {
       $array=@(); foreach ($x in (1..$size)){$array += $x}
  }).TotalMilliseconds;
}
$hash

Array Size

Total Milliseconds

100

5

1,000

43

10,000

2,800

100,000

310,000

if 43ms sounds a bit abstract, disqualification rules in athletics say you can’t react in less than 100ms. A “blink of an eye” takes about 300-400ms. It takes ~60ms for PowerShell to generate my prompt, it’s not worth cutting less than 250ms off  time-back-to-prompt. Even then a minute’s work to save a whole second only pays for itself after 60 runs. (I wrote in April about how very small “costs” for an operation can be multiplied many-fold: saving less than 100ms on an operation still adds up if a script does that operation 100,000 times; we can also see a difference when typing between 50 and 100ms responses, but here I’m thinking of things which only run once in a script). 

At 10K array items, the possible saving is a couple of seconds, this is in the band of acceptable times that are slow enough to notice. Slower still and human behaviour changes: we think it’s crashed, or swap to another task and introduce a coffee break before the next command runs. 100K items takes 5 minutes. But even that might be acceptable in a script which runs as a scheduled task. Do you want to guess how long a million would take ?
$a = 1..999999 will put 999,999 items into an array in 60ms on my machine – $variable = Something_which_outputs_an_array   is usually a quick operation.
$a += 1000000 takes 100ms. Adding the millionth item takes as long as adding the first few thousand. The first 100K take a few minutes, the last 100K take a few hours. And that’s too long even for a scheduled task.

The exponent which makes things scale UP badly means they scale DOWN brilliantly – is a waste of effort to worry about scale if tens of items is a big set, but when thousands of items is a small set it could be critical. Removing operations where each repetition takes longer than the one before can be a big win because these are the root of a exponential execution time.   
The following scrap works, but its is unnecessarily slow; it’s not dreadful on clarity but it is longwinded. There are also faster methods than Piping many items into foreach-object

$results = @()
Get-Stuff | foreach-object {$results += $_ }
return $results

This pattern can stem from thinking every function must have a return, which is called exactly once, which isn’t the case in PowerShell. It’s quicker and simpler just as Get-Stuff, or if some processing needs to happen between getting and returning the results then something like the following, if the work is done object-by-object:
Get-Stuff | foreach-object {output_processed $_} 
or if the work must be done on the whole set:       
$results = Get-Stuff    
work_on $results  #returning  final result

Another pattern looks like this.
put_some_result in $a
some_loop {
  Operations         
  $a += result
}

this works better as
put_some_result in_$a
$a += some_loop {
  Operations         
  Output_result
}

A lot of cases where a better “add to array” looks like then answer are forms of this pattern and getting down to just one add is a better answer.
When thousands of additions are unavoidable, a lot of advice says use [Arraylist] but as Anthony’s post points out, more recent advice is to use [List[object]] or [List[Type]].

Postscript

At the same time as I was posting this, Tobias was looking at the same problem with strings. Again building up a 1,000,000 line string one line at a time is something to be avoided and again, it takes a lot longer to add create a new sting which is old-string + one-line when the old-string is big than when it is small, and I found that fitted a square law nicely 10,000 string-appends took 1.7 seconds; 100,000 took 177 seconds. It takes as long to add 10 strings at lines to 100,000 to 100,010 line as adding the first 3,000 to an empty version. His conclusion – that if you really can’t avoid doing this, using a stringBuilder is much more efficient – is a good one, but I wouldn’t bother with one to join half a dozen strings together.

October 13, 2019

The colour of data

Filed under: Powershell — jamesone111 @ 1:55 pm

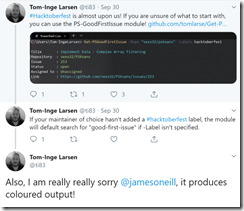
imageI was speaking at the PSDayUK event in Birmingham recently, I had a good audience quite a few of them said nice things on twitter afterwards. A couple of days this showed up in my feed.

Why is Tom apologizing ?

I was talking about writing code to be sharable and easily re-usable, and I had a slide headed

The Biggest need to rewrite …

  • Scripts which are too concerned with printing output on screen
    • Write-Host –because coloured output is important.

And I said something along the lines of “If what colour should it be” seems like an important question your focus is wrong. And I think I said that formatting should convey something.  Why did I put the previous bit in bold ? So that if you skim down the page important things jump out. We know instinctively, that Red output means error, and Orange means warning, we learn how editors colour code different parts of syntax and what initially feels a bit random soon makes sense.  But what about the use of cyan and green text tell us in the screen shot Tom posted ? The link is not clickable in most places where PowerShell is hosted (it is in Visual Studio code), and the title definitely isn’t. Might the green sometimes turn red to indicate a problem ? No, it’s always green. This is formatting at the whim of the author. I’m left looking for a deeper meaning that isn’t there, so in a sense this “prettiness” is making a less effective result.
[Edit: After I posted this Steve Lee reminded me that some people may need to customize the colour of the error messages, so it is not completely safe to assume Red. Forcing text into a specific colour might make it unreadable for some users.]

Interestingly the author hadn’t gone down the rat-hole of using Write-Host. So this will work
$GFI =  Get-PSGoodFirstIssue
Start $GFI.html_url

This alone saves the need to rewrite to use the command in a way the author didn’t think of, which is a fairly big win. However that’s not quite the end of the story because
$GFI > temp.txt
Gives a text file like this

Title       : {esc}[96mPowerShell should… {esc}39[m
Repository  : {esc}[92mPowerShell/PowerShell{esc}39[m
Issue       : {esc}[92m2875{esc}39[m
Status      : {esc}[92mopen{esc}39[m
Assigned to : {esc}[92mUnassigned[{esc}39[m
Link        : {esc}[96mhttps://github.com/PowerShell/PowerShell/issues/2875{esc}39[m

The {esc}[  introduces a control sequence. 96m sets the foreground to bright cyan, and 92m sets it bright green and 39m sets it back to the default. How did that happen ?
In the function, a type is set on the data to be returned, like this
$issue.pstypenames.insert(0,"PSGFI.GithubIssue")

and Type data is set up for this type with half a dozen lines like this one.
Update-TypeData -TypeName PSGFI.GithubIssue -MemberType ScriptProperty -MemberName "Title "
                
-Value {$this.Title -replace '.*',"`e[96m`$0`e[39m"} -Force
  

Notice that for the title property here it creates a new title-with-a-trailing space property.
And finally the script adds one more piece of type data to say what should be displayed by default.
Update-TypeData -TypeName PSGFI.GithubIssue -DefaultDisplayPropertySet "Title ", 
                                Repository
, Issue, Status, "Assigned to", Link
 

The net effect of all of this is that the returned object is given 6 extra properties, and those properties are displayed by default.
If you want the original object and its properties, they are there, untouched. They are available for a Select-Object or Format-List command to get different output – much better than Write-Host.

Instead of adding the properties via TypeData, it’s possible to acheive the same effect on output using a format.ps1xml file, the result is the same: the default formatter outputs text with ANSI escape sequences embedded in it.  The whole thing could be done as using Format-List with custom properties and adding a –Raw option to output unformatted data, but the formatted version gives the same results when redirected and when saved to a variable this gives bad results.

Emphasis in PowerShell 7 Preview (daily build)
While I was drafting this, the preview of PowerShell 7 updated Select-String to have an emphasis option which on by default, but can be turned off with –NoEmphasis.  This conveys information – Select-String matches regular expressions, so finding the matching text by eyeball alone might be hard work. The default formatting for the [MatchInfo] objects that Select-String returns says “Call the object’s .ToString() method” and it is a change in .tostring() which applies the new formatting.  The result is the same – objects with the right properties for the pipeline and escape sequences preserved if redirecting to a the file. Quickly putting > filename after a select-string command isn’t a very common thing to do, the command-line switch works provided you remember to use it and those who frequently do it can use a format.ps1xml file or set a default for the parameter
$PSDefaultParameterValues=@{"Select-String:NoEmphasis"=$true} to prevent it, so the file content issue should be over-stated.

My original advice was not to get too hung up on formatting, to use colour sparingly to add meaning (not to ‘pretty things up’) and never compromise on passing proper objects along the pipeline; and that advice remains. It doesn’t mean colour is never beneficial, the preview Select-String shows it can be, but the benefit has side effects and the ideal is allow people to turn it off. [Edit that ability to turn it off is can help avoid accessibility issues, and be very careful with dark colours on a dark background. ]

September 23, 2019

The classy way to complete and validate PowerShell Parameters

Filed under: Powershell — jamesone111 @ 1:51 pm
Tags: , ,

Do you ever wonder why PowerShell parameters are written the way they are? For example, when saying a parameter may have a value of null why does the attribute need to be written [AllowNull()]  with an empty () ?   

A simple answer would be that [AllowNull] alone would be setting the type for parameter’s content, but other attributes have things inside the brackets, and these vary: some just have the argument values, for example [ValidateRange(0,5)]
And others have Name=Value, like [Parameter(ParameterSetName='Another Parameter Set')]

These ‘tags’ , more properly called ‘attributes’ are actually types, and we can see what happens when an instance of them is created; here’s the New method for ValidateRange:

>[ValidateRange]::new

  OverloadDefinitions
  -------------------
  ValidateRange new(System.Object minRange, System.Object maxRange)

The constructor for a new ValidateRange object needs the min and max values for the range; if you create one with the New-Object cmdlet you need to put these in the -ArgumentList parameter.   Often you see the New-Object written as New-object ValidateRange(0,5) which looks like the “New” statements in other languages. PowerShell parses that line as New-object -TypeName ValidateRange –Argumentlist (0,5).

Looking at the constructor for the  Parameter attribute, shows that it takes no arguments:
>[Parameter]::new

  OverloadDefinitions
  -------------------
  Parameter new()

If “ParameterSetName=’Another Parameter Set’” in the example above is not an argument for the constructor, what is it?
The best way to find out is to create one of these objects and look inside:

>[Parameter]::new() | gm -MemberType Property

      TypeName: System.Management.Automation.ParameterAttribute     
  Name                            MemberType Definition     
  ----                            ---------- ----------
  DontShow                        Property   bool DontShow {get;set;}
  HelpMessage                     Property   string HelpMessage {get;set;}
  HelpMessageBaseName             Property   string HelpMessageBaseName {get;set;}
  HelpMessageResourceId           Property   string HelpMessageResourceId {get;set;}       
  Mandatory                       Property   bool Mandatory {get;set;}
  ParameterSetName                Property   string ParameterSetName {get;set;}     
  Position                        Property   int Position {get;set;}
  TypeId                          Property   System.Object TypeId {get;}
  ValueFromPipeline               Property   bool ValueFromPipeline {get;set;}
  ValueFromPipelineByPropertyName Property   bool ValueFromPipelineByPropertyName {get;set;}
  ValueFromRemainingArguments     Property   bool ValueFromRemainingArguments {get;set;}

Notice that the type name is “ParameterAttribute” – all these types have a suffix of “attribute” which is added automatically. The properties are all valid names in a [Parameter()] declaration, so
[Parameter(ParameterSetName='Another Parameter Set')]  means create a new ParameterAttribute object and set its “ParameterSetName” property. Much like setting properties in the New-Object command with the -Property parameter.

Argument completion and validation.

For a long time now I have been writing Argument Completers, for example to allow the name of a printer to be completed by pressing [Tab]. Usually these are written as functions and registered like this:
Register-ArgumentCompleter -CommandName Out-Printer -ParameterName PrinterName -ScriptBlock $Function:PrinterCompletion  

PowerShell 5 added a new parameter attribute to specify an Argument Completer. Its constructor looks like this:

>[ArgumentCompleter]::new

  OverloadDefinitions
  -------------------
  ArgumentCompleter new(scriptblock scriptBlock)
  ArgumentCompleter new(type type)

The new attribute can contain the whole of the script block (instead of saving it as a function) or use a small script block as a wrapper to call a function like this:
{PrinterCompletion $args}    

I saw the ArgumentCompleter attribute used with script block in a script someone had shared on-line (I’d like to credit them here but I can’t recall who it was), initially I thought it was something which had been in PowerShell as long as all the other parameter attributes, the about_functions_advanced_Parameters help was only updated to include it in V6 but the first script where I used failed on PowerShell 4 and more checking showed it was only added in V5. So I mentally filed it as “one to go back to”.

I had to go back to it recently because I was converting a script cmdlet to C# and I didn’t want leave the completers as scripts.
Moving the script block out of the call to Register-ArgumentCompleter and into a parameter attribute is simple enough, but it takes a bit more digging to understand using a type; and after looking at all the parameter attributes, I found a similar one which is new in PowerShell 6 (Core)

>[validateset]::new
     
  OverloadDefinitions     
  -------------------     
  ValidateSet new(Params string[] validValues)     
  ValidateSet new(type valuesGeneratorType)

In both cases the type parameter is a class that we define. One class might complete Color parameters used in for Excel formatting; another might validate printer names. The classes must implement methods which follow a specific template, and these templates are usually known as “Interfaces”, so for for a ValidateSet the interface says “I have a Method, GetValidValues()” – and for an Argument Completer it says “I have a method CompleteArgument(String, String, String, CommandAst, IDictionary)” which is the same set of parameters you can use when writing a script block for the attribute or for Register-ArgumentCompleter.

Let’s look at converting from using the Register-ArgumentCompleter example above to using a class which implements the IArgumentCompleter interface.  I wrote a function to give PowerShell 6 (core) the Out-Printer functionality found in Windows PowerShell (5); I wanted Tab-completion of printer names and the function to do that looks like the code below:

Function PrinterCompletion {
    param
(
      
$commandName
,         
      
$parameterName,
 
       $wordToComplete
,
 
       $commandAst
,
 
       $fakeBoundParameter
   
)       
    $wildcard          = ("*" + $wordToComplete + "*")

    [System.Drawing.Printing.PrinterSettings]::InstalledPrinters.where({$_ -like $wildcard }) |
        ForEach-Object {[System.Management.Automation.CompletionResult]::new("'" + $_ + "'")}

}

So the change is to implement this as a method of a class, and use an the argumentcompleter parameter attribute to my new class, before going into that there is an one other thing to look at…

Using “using”

Powershell 5 supports a using statement in a similar way to C# and VB to shorten
System.Management.Automation.CompletionResult to CompletionResult, or
System.Drawing.Printing.PrinterSettings to PrinterSettings  
Sometimes writing things explicitly is good but a using statement reduces verbosity without sacrificing clarity.
Classes need be explicit about types where functions can be lazy so before converting the function I’m going to type all the parameters and that would look horrible with Using  – I need to specify 4 namespaces because CommandAst, IDictionary, PrinterSettings and CompletionResult are each in different ones; the revised function looks like the following example. 

using namespace System.Collections
using namespace System.Drawing.Printing
using namespace System.Management.Automation
using namespace System.Management.Automation.Language

Function PrinterNameCompleterFunction {
    param(
    [string]      $commandName,
    [string]      $parameterName,
    [string]      $wordToComplete,
    [CommandAst]  $commandAst,
    [IDictionary] $fakeBoundParameter
    )

    $wildcard          = ("*" + $wordToComplete + "*")

    [PrinterSettings]::InstalledPrinters.where({$_ -like $wildcard }) |
        ForEach-Object –Process {[CompletionResult]::new("'" + $_ + "'")}

}

This version will work with Argument Completer attribute and a simple script block like this :
[ArgumentCompleter({PrinterNameCompleterFunction $args})]
$name


The class implements IArgumentCompleter: and function morphs into the class’s only method, “CompleteArgument”. As well as being explicit about inputs, methods are more explicit about returning their results and what type they are so the class looks like this:

using namespace System.Collections
using namespace System.Collections.Generic
using namespace System.Drawing.Printing
using namespace System.Management.Automation
using namespace System.Management.Automation.Language
     
 
class printerNameCompleterPSClass : IArgumentCompleter {
    [IEnumerable[CompletionResult]] CompleteArgument(
        [string]      $CommandName ,
        [string]      $ParameterName,
        [string]      $WordToComplete,
        [CommandAst]  $CommandAst,
        [IDictionary] $FakeBoundParameters
    )
    { 
        $wildcard          = ("*" + $wordToComplete + "*")
       
$CompletionResults = [List[CompletionResult]]::new()
        [PrinterSettings]::InstalledPrinters.where({$_ -like $wildcard } |
            ForEach-Object {$CompletionResults.Add([CompletionResult]::new("'" + $_ + "'")}
        return $CompletionResults
    }
}

With the class in place it can be used in the Argument Completer attribute like this:

    [ArgumentCompleter([printerNameCompleterPSClass])]
    $name

If/when you write cmdlets in C#, classes are the way to embed the completers and we can also write the class in C# and load it with Add-Type, in a PowerShell script like the following:

Add-type  -ReferencedAssemblies "System.Drawing.Common", "System.Linq",
                  
"System.Collections", "System.Management.Automation"  -TypeDefinition
@"
using System.Collections;
using System.Collections.Generic;
using System.Drawing.Printing;
using System.Linq;
using System.Management.Automation;
using System.Management.Automation.Language;
public class printerNameCompleterCSharpClass: IArgumentCompleter {
   
IEnumerable<CompletionResult> IArgumentCompleter.CompleteArgument(
        string      commandName,
       
string      parameterName,
        string      wordToComplete,
        CommandAst  commandAst,
        IDictionary fakeBoundParameters
    )
    {
        WildcardPattern wildcard = new WildcardPattern("*" + wordToComplete + "*", WildcardOptions.IgnoreCase);
        return PrinterSettings.InstalledPrinters.Cast<string>().ToArray().
            Where(wildcard.IsMatch).Select(s => new CompletionResult("'" + s + "'"));
    }

}
"@ -WarningAction SilentlyContinue    

The list of referenced assemblies may need to change on different versions of PowerShell, this one was PowerShell 7 Preview 4.
Note that the class needs to be a Public class, and because it has no public methods, Add-Type generates a warning (which is supressed in the example above).
I can see reasons for using any of the ways

  • For compatiblity with PowerShell before V5, stick with Register-ArgumentCompleter, this has the disadvantage that you can’t see there is a completer when you are looking at the code, which is solved if you … 
  • Use the argument completer attribute with a PowerShell function or Class. If you won’t target older versions. The function is probably more natural to write.
  • If you are prototyping a cmdlet to which will eventually be implemented in C#, then using a C# class from the start saves changing it later; and if you have code that you can borrow from C# it saves re-writing, just ensure the class is public and you list the right assemblies to for the version of PowerShell.

Completers and ValidateSets drive Intellisense, but the behaviour is different. Completers suggest Completing one parameter based on the value of anotherwhat the full argument could be, returning a list of based on what has been typed so far, they can use everything on the command line to make a suggestion, so when I wrote Get-Sql the completer for column names looks at the –Table parameter and gets the columns for that table.
The completer decides which of the “possibles”  are valid suggestions – and completer can become sluggish if the logic in it is to complicated.  
In the printer names example above I wanted “PDF” to suggest “Microsoft Print to PDF” so the filter matches "*$wordToComplete*". The user is not constrained to the the values suggested by the completer – for example it might suggest, “Red” or “Green” but #0000ff might a valid way to specify Blue. The validation inside the function decides that “Gray” is valid and “Grey” is not  – even the names of colors/colours change their spellings in different flavours/flavors of English.   

ValidateSets define allowed choices,  if the value entered is not in the set, PowerShell will throw an error saying “valid values are …”.  The set is passed to the shell which filters the list to valid options (this only works against the start of the text, so “PDF” doesn’t match “Microsoft Print to PDF”). PowerShell will also use Enum types to produce a set of of choices, but an invalid value causes a different error when PowerShell tries to convert it to the Enum type.  

Hard coding the valid values will fail for some things, like Printers or Fonts which vary between machines ; V6 supports using types which implement the IValidateSetValuesGenerator interface; the interface specifies one method “GetValidValues” which takes no arguments and returns an array of strings, a ValidateSet for printer names can be created at runtime, with a class like this:
      
using namespace System.Management.Automation      
using namespace System.Drawing.Printing

class ValidPrinterSetGenerator : IValidateSetValuesGenerator { 
    [string[]] GetValidValues() {
        return [string[]][PrinterSettings]::InstalledPrinters
    }

}

and which can be used like this

    [ValidateSet([ValidPrinterSetGenerator])]
    $name

As with the argument completer, this class could be written in C#,  and loaded with Add-Type; the following example is written for PowerShell 7 preview 4:

Add-type  -ReferencedAssemblies "System.Drawing.Common", "System.Linq",
              "System.Management.Automation"  -TypeDefinition
@"
using System.Drawing.Printing;
using System.Linq;
using System.Management.Automation;
public class PrinterNameValidator : IValidateSetValuesGenerator {
      public string[] GetValidValues() {
        return PrinterSettings.InstalledPrinters.Cast<string>().ToArray();
      }
}
"@

Adding customer parameter attributes

Additional special attribute classes are available in PowerShell 5 onwards, and they are used in slightly different way. You still declare a class, but now that class says it implements one of two classes rather than an interface. One of these does validation, and its job is to throw an error when the argument is not valid; here is an example.

using namespace System.Management.Automation
using namespace System.Collections.Generic
using namespace System.Drawing.Printing

class ValidatePrinterExistsAttribute : ValidateArgumentsAttribute {
    [void] Validate([object]$Argument, [EngineIntrinsics]$EngineIntrinsics) {
        if(-not ($Argument -in [PrinterSettings]::InstalledPrinters)) {
          Throw [ParameterBindingException]::new("'$Argument' is not a valid printer name.")
        }
    }
}

This creates a class whose name ends with “Attribute” which implements the ValidateArgumentsAttribute class; it inherits the properties and methods of that class but replaces the Validate() method with its own code. Validate doesn’t return a value, it either completes or it throws an exception, and it takes two arguments, the argument being validated and “Engine Intrinsics” which is what we can see as $ExecutionContext in a script. This has some advantages over using [ValidationScript{}]:

  • It is easier to read than embedding a long script in an attribute.
  • It removes duplication when same validation applies to multiple parameters (for example if we have to apply the same Printer name check in more than one command)
  • We control the error message. This :
    'Wibble' is not a valid printer name
    is more helpful than 
    Cannot validate argument on parameter 'name'. The "$_ -in [System.drawing.Printing.PrinterSettings]::InstalledPrinters " validation script for the argument with value "wibble" did not return a result of True.
    Determine why the validation script failed, and then try the command again.
  • It’s how things are done in C# – as before , the class above could be written in C# and loaded using Add-Type.

When we tag a parameter with this class we omit the “Attribute” part of the Class name and need to include the () to say we are creating a new object of this type as an attribute, so it is written:

    [ValidatePrinterExists()]
    $name
 

The other class that works in this way is the Argument Transformation Attribute. Again we have the option to use Add-Type and write the class in C# but if we do it PowerShell the declaration looks like this 

using namespace System.Management.Automation
using namespace System.Collections.Generic
using namespace System.Drawing.Printing

class PrinterTransformAttribute : ArgumentTransformationAttribute  {
    [object] Transform([EngineIntrinsics]$EngineIntrinsics, [object] $InputData) {
       

       ## transform $inputdata to $something
       
        return $something
    }
}

This,too can throw if the input is invalid, so I could look for a printer which matches InputData and if I find exactly one, return it. If I find none, or more than one, I can throw an error. This might be better than using the custom validate set: I have these printers on my Laptop:

Brother HL-1110 series
EPSON Stylus Photo R2880
Fax
Microsoft Print to PDF
Microsoft XPS Document Writer
OneNote
Send To OneNote 2016

Notice I have two OneNote versions, each with their own driver. So a transformation attribute would need to check for a perfect match and then check for a partial match. If I combine this with the completer I can:-

  • Keep pressing tab until I get “Microsoft Print to PDF”
  • Type PD [tab] to fill in “Microsoft Print to PDF”
  • Type PDF and let the transformation attribute change it to “Microsoft Print to PDF”
  • Use “Brother”, “Epson”, “PDF”, “XPS”, or “OneNote” as printer short names.
  • Reject names which are wrong like “PFD” or ambiguous like “Microsoft”

More than one combination of validation, completion and transformation may be right, and different ones might be optimal in different cases. If you need backwards compatibility your choices are more limited, but knowing what is available, and where, lets you pick the one best suited for the task at hand. I like to tell people that job of validation is to help users put in good input, not to save you from catching bad input, intellisense, transformation, and custom validations help.
A message like  Supply an argument that matches "\d{2}-\d{2}-\d{2}[a-z]?" will is unhelpful;  but a custom validator takes only a little longer to write and can tell the user ”'1234' is not a valid Part number. Part numbers are formatted as '11-22-33' or '99-88-77C'; it can can be reused if part numbers a parameters in multiple places, and it also makes the script easier to read later, because [ValidatePattern("\d{2}-\d{2}-\d{2}[a-z]?")] means we mentally parse the regular expression and then say, “ah, yes, that’s describing a part number”.  [ValidAsPartNumber()] tells us what is being done, if we need to know how we look somewhere else for the answer. They don’t support early versions of Windows PowerShell (4 and below), but I expect to use them where that is not an issue.
August 21, 2019

Exit, Throw, Return, Break and Continue. A Round up.

Filed under: Powershell — jamesone111 @ 2:14 pm

PowerShell recognises all the words in the title. I’ve previously written about the problem with assuming that throw will exit from a script or function. Normally it will, but if the error action preference has been changed it might not. So I now put return after throw to prevent execution running on.

Making exceptions for exceptions

Return is one of those Powershell commands that people get upset about; we can break normal rules to handle exceptions, I tend to avoid using throw, unless I expect something to want to catch the error. I prefer this:

Write-Warning "Couldn't do what you wanted with $parameter." ; return
to this:
Throw "$parameter is Evil" ; return

But when it isn’t really an exception… I was taught that this:
if ($result) {return}
Nextcommand
etc
FinalCommand

is wrong – I can hear “that’s just ‘goto end’, and you know `goto` is evil” and the right way is:
if (-not $result) {
  Nextcommand
  etc
  FinalCommand

}

However when the “etc” part of that code goes on for a whole screen it gets hard to see that nothing else happens if $result evaluated as true; in that case  putting in a comment (“If result was set, the work is complete”) and using return can make things clearer. I’ll come back to this later.

Break and stopping with “Continue”

There are two other sort-of “goto” commands which can be allowed: Continue has one use if you use trap instead of try/catch, which is to resume execution at the line after the error. It has another use in loops; to save doing the job of an if which runs a large amount of the script conditionally, continue says “Skip the rest of the work for this item and Continue with the next one.”, it has a companion, break which says “Skip the rest of the work on for this item, and don’t bother with any remaining ones.”  Here’s a slightly contrived example, finding primes with the sieve of Eratosthenes


$Primes = @()
foreach ($i in 2..100) {
    $isPrime = $true
    foreach ($p in $Primes) {
        if ($i % $p -eq 0 ) {$isPrime = $false; break}
    }
    if (-not $isPrime) {continue}
    Write-Verbose "$i is prime" -Verbose
    $primes += $i
}

There are two nested loops. The inner one looks at each of the primes already found and sees if the number being looked at divides by any of them. Once we have found one we don’t need to look at any of the others, break gets us out of that for loop, but not out of the Outer loop or the script or function that contains it. 
The outer loop does something if the number IS prime, but it uses continue to go on to the next number – I said the example was contrived, the if would normally be written the other way round without using continue.

Switch Statements

Both Break and continue work in a switch statement if you are using switch against a file, break stops looking and ignores the rest of the file, and Continue stops for the current line and continues for the next. I’ve saved the fragment below as deleteMe.Ps1 so it reads itself …

Switch -Regex -file .\deleteme.ps1 {
    "w" {"Contains W" ; break}
    "o" {"Contains o" ; break}
    default {"Default msg"}
}

The first line matches on the W in switch so it outputs “Contains W” and the statement stops.
If I replace each break with continue I get
“Contains W”, “Contains W”, “Contains O”, “Default”, and “Default”.
I.e. each line line is processed for a maximum of one match; And if I remove break/continue , the second line matches both W in the quotation marks and the O  in “contains” so I get
“Contains W”, “Contains W”, “Contains O”,“Contains O”, “Default”, and “Default”.

But that is the less common way to use switch this is more usual:

$s = "Hello World"
Switch -Regex ($s) {
    "w" {"Contains W" ; }
    "o" {"Contains o" ; }
    default {"Default msg"}
}

Here, without break or continue the value matches two values and outputs “Contains W”, “Contains O”, because only one value is examined, both break or continue have the same effect. Default only gets run if nothing matches.  Often I’ll see something a switch statement that could be written like this: 

Switch ($birthday.tostring("dddd")) {
   "Monday"      {"fair of face"}
   "Tuesday"     {"full of grace"}
   "Wednesday"   {"full of woe"}
   #etc
}

and although the values don’t overlap and all there isn’t an “Output this for ‘none of the above’”  (we’ve written the case for each of the days) the writer has carefully added Break or Continue to each of the blocks and a default block which only contains Continue. Does putting these things in and being absolutely explicit make things clearer ? I don’t think so. Putting in an empty “else” is just more to read; and the continue is a stylistic tick – because it is needed sometimes, and it is harmless when it is not needed why not put it in always?  It’s more typing, more to read and some people will focus on the tick. 

Break and Continue work anywhere. Switch, while, for, and foreach statements handle them as “exit from this statement”, other commands (including if and the ForEach-Object cmdlet) treat them as “exit from where this is running”  So I could write this:
Write-Warning "Couldn't do what you wanted with $parameter." ; break
or this:
Write-Warning "Couldn't do what you wanted with $parameter." ; continue

But using “Continue” to exit from a function or script is showing off in a “I know a trick that I bet you don’t” kind of way. It hinders when someone else is dealing with my code. Lately I find I keep repeating the importance of clarity, some people like to say “Imagine the next person who looks at this is an axe wielding maniac who knows where you live”; I imagine that the next person will be me, and people will be screaming that something is broken, it’s late, I’m tired and I have forgotten ever writing the script.    

Since I’ve returned to the example that used return, it’s worth taking a moment to mention that I have written about implicit or explicit return before.
Some people habitually write return $result as the last line of their function / script ; which sets other people’s teeth on edge. I tend to only write that if, somewhere before the end of a function / script I would otherwise write
$result
return

As I said at the start my computer science training would tell me that I should write this way : 
#try quick way
$result = simpleCommand
if (-not $result) {
    complex | pipeline -of "commands"
}
else {$result}


But I think the return in the next example is OK: it is clearer so say “if we got a result return it, otherwise do X, Y and z;” than to write it the other way around “if we didn’t get the result do X,Y and Z, otherwise return the result”. (If one clause is simple and one is complex, put the simple clause in the IF ).   
#try quick way
$result = simpleCommand
if ($result) {return $result}       
complex | pipeline -of "commands"  

but this next return is unnecessary

$Result = complex | pipeline -of "commands"     
return $result     

And finally … Exit

And then there is Exit. Exit says “Leave what you are running” at the PowerShell prompt it is Leave PowerShell, in a script it is Leave the script. Exit can return an exit code. If a script wants to tell another script or PowerShell itself what happened it should really send output or throw errors; some people really don’t like seeing Exit in a script and often it’s just old habits refusing to die. Codes don’t help fix a problem “Error 4096 occurred” doesn’t help users understand what did go wrong but makes them feel worse for not knowing 4095 other things that might have gone wrong.  But sometimes an error code is the only way to to tell something which called the script what happened.

However in a script exit doesn’t always behave as people expect:  
PowerShell "something" is treated as PowerShell –Command "something" which  works like this:

  • It starts PowerShell,
  • It runs the command and returns any output
  • Because -command was specified and –NoExit wasn’t, PowerShell exits. If the last command ran to completion the exit code is 0; if the last command threw a terminating error the exit code is 1.

So

  • If I run PowerShell –Command "1/0" from an existing instance of PowerShell $LASTEXITCODE is 1 ;
  • If I run PowerShell –Command "1/0 ; hostname"  it is 0 because the last command ran to completion and past errors are forgotten.
  • If I run PowerShell –Command "MyScript.ps1" the rules don’t change. PowerShell returns an exit code of 1 or 0 depending on whether the last (only) command threw an error.   If the script ends with exit 123 then $LASTEXITCODE is 123 in that instance of PowerShell and in that instance something else can see that exit code. 
    Then when that instance of PowerShell exits, it follows the standard rules – the Exit code from the script is lost.

I’m sure someone must want this behaviour, but there are multiple ways to get the script’s exit code back one is to make a command which runs the script, and explicitly exits with the code it returns, like this:
powershell 'MyScript.ps1; exit $lastexitcode'  
A better way is to tell PowerShell this is not a command, but a file. That does return the the error code from the script. 
Don’t run  PowerShell 'MyScript.ps1' instead run  
PowerShell –File 'MyScript.ps1'.

In PowerShell [core] 6 and later the behaviour is reversed so pwsh –command 'hostname' needs the explicit –command but Pwsh 'MyScript.ps1' doesn’t need the explicit –File.  Getting in the habit of being explicit with the switches in either environments means if/when a script/command it should do what you expect.

The other way  is to put
$host.setshouldExit(123)

in the script. This time when PowerShell exits it has been primed to leave with a specific code. Which is better ? Of course, it depends. It you want to test the script by running it in PowerShell and looking at $lastExitCode using exit in the script might be better, but it relies on others not just running powershell MyScript  The second way (with information written to error or verbose) avoids that, and as bonus lets you set what code should go back from PowerShell to the caller if a terminating error happens in specific section of code, and then change the code for the next section and so on.

June 22, 2019

Last time I saw this many shells, someone sold them by the sea shore.

Filed under: Azure / Cloud Services,Linux / Open Source,Powershell,Uncategorized — jamesone111 @ 10:04 pm

I’ve been experimenting with lots of different combinations of shells on Windows 10.

imageBASH.  I avoided the Subsystem for Linux on Windows 10 for a while. There are only two steps to set it up – adding the Subsystem, and adding your chosen Linux to it. If the the idea of installing Linux into Windows, but not as a virtual machine, and getting it from the Windows store gives you a headache, you’re not alone, this may help or it make things worse. I go back to the first versions of Windows NT which had a Windows-16 on Windows-32 subsystem (WoW, which was linked to the Virtual Dos Machine – 32-bit Windows 10 can still install these), an OS/2 subsystem, and then a Posix subsystem. Subsystems translated APIs so binaries intended for a different OS could run on NT, but kernel functions (drivers, file-systems, memory management, networking, process scheduling) – remained the responsibility of underlying OS. 25 years on, the Subsystem for Linux arrives in two parts – the Windows bits to support all the different Linuxes , and then distributor-supplied bits to make it look like Ubuntu 18.4 (which is what I have) or Suse or whichever distribution you chose. wslconfig.exe will tell you which distro(s) you have and change the active one. There is a generic launcher wsl.exe which will launch any Linux binary in the subsystem so you can run wsl bash but a Windows executable, bash.exe streamlines the process

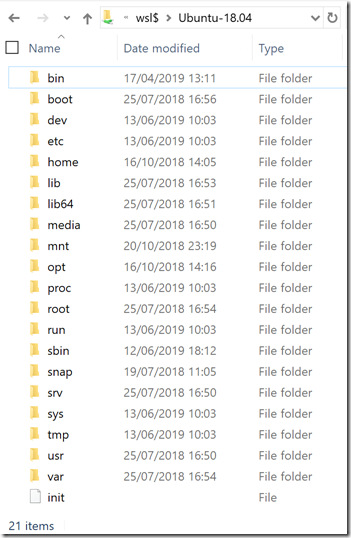
imageLinux has a view of Windows’ files (C: is auto-mounted at/mnt/c and the mount command will mount other Windows filesystems including network and removable drives) but there is strongly worded advice not to touch Linux’s files via their location on C: – see here for more details. – Just before publishing this I updated the 1903 release of Windows 10 which adds a proper access which you can see in the screen shot 
Subsystem processes aren’t isolated – although a Linux API call might have a restricted view of the system. For example ps only sees processes in the subsystem but if you start two instances of bash, they’re both in the subsystem they can both see each other and running kill in one will terminate the other. The subsystem can run a Windows binary (like net.exe start which will see Windows services) and pipe its output into an Linux one, like less;  those who prefer some Linux tools get to use them in their management of Windows.
The subsystem isn’t read-only – anything which changes in that filesystem stays changed – since the subsystem starts configured for US Locale,
sudo locale-gen en_GB.UTF-8 and sudo update-locale LANG=en_GB.UTF-8 got me to a British locale. 

Being writable meant I could install PowerShell core for Linux into the subsystem: I just followed the instructions (including running sudo apt-get update and sudo apt-get upgrade powershell to update from 6.1 to 6.2). Now I can test whether things which work in Windows PowerShell (V5), also work with PowerShell Core (V6) on different platforms.  I can tell the Windows Subsystem for Linux to go straight into PowerShell with  wsl pwsh (or wsl pwsh –nologo if I’m at a command line already). Like bash it can start Windows and Linux binaries and the “in-the-Linux-subsystem” limitations still hold. Get-Process asks about processes in the subsystem , not the wider OS. Most PowerShell commands are there; some familiar aliases overlap with Linux commands and most of those have been removed (so | sort will send something to the Linux sort, not to sort-object,  and ps is not the alias for get-process;  kill and CD are exceptions to this rule.). Some common environment variables (Temp, TMP, UserProfile, ComputerName) are not present on Linux, and Windows specific cmdlets, like Get-Service,  don’t exist in the Linux world, and tab expansion switches to Unix style by default but you can set either environment to match the other. My PowerShell Profile soon gained a Set-PsReadlineOption command to give me the tab expansion I expect and it sets a couple of environment variables which I know some of my scripts use.  It’s possible (and tempting) to create some PSDrives which map single letters to places on /mnt, but things like to revert back to the Linux path. After that V6 core is the same on both platforms

PowerShell on Linux has remoting over SSH; it connects to another instance of PowerShell 6 running in what SSH also terms a “subsystem”. Windows PowerShell (up to 5.1) uses WinRM as its transport and PowerShell Core (6) on Windows can use both. For now at least, options like constrained endpoints (and hence “Just Enough Admin”  or JEA), are only in WinRM.
The instructions for setting up OpenSSH are here; I spent a very frustrating time editing the wrong config file – there is one in with the program files, and my brain filtered out the instruction which said edit the sshd_config file in C:\Program Data\ssh. I edited the one in the wrong directory and could make an SSH session into Windows (a useful thing to know to prove Open SSH is accepting connections) but every attempt to create a PowerShell session gave the error
New-PSSession : [localhost] The background process reported an error with the following message: The SSH client session has ended with error message: subsystem request failed on channel 0.
When I (finally) edited the right file I could connect to it from both Windows and Linux versions of PowerShell core with New-PSSession -HostName localhost.  (Using –HostName instead of –Computername tells the command “This is an SSH host, not a WinRM one”). It always amazes me how people, especially but not exclusively those who spend a lot of time with Linux, are willing to re-enter a password again and again and again. I’ve always thought it was axiomatic that a well designed security system granted or refused access to many things without asking the user to re-authenticate for each (or “If I have to enter my password once more, I’ll want the so-called ‘Security architect’ fired”). So within 5 minutes I was itching to get SSH to sign in with a certificate and not demand my password.

image I found some help here, but not all the steps are needed. Running the ssh-keygen.exe utility which comes with OpenSSH builds the necessary files – I let it save the files to the default location and left the passphrase for the file blank, so it was just a case of hitting enter for each prompt. For a trivial environment like this I was able to copy the id_rsa.pub file to a new file named authorized_keys in the same folder, but in a more real world case you’d copy and paste each new public key file into authorized_keys, then I could test a Windows to Windows remoting session over SSH. When that worked I copied the .ssh directory to my home directory in the Subsystem for Linux, and the same command worked again.

imagePowerShell Core V6 is built on .NET core, so some parts of PowerShell 5 have gone missing: there’s no Out-Grid, or Show-Command, No Out-Printer (I wrote a replacement), no WMI commands, no commands to work with the event log, no transactions and no tools to manage the computer’s relationship with AD.  The  Microsoft.* modules provide about 312 commands in V5.1 and about 244 of those are available in V6; but nearly 70 do things which don’t make sense in the Linux world because they work with WinRM/WSMan, Windows security or Windows services. A few things like renaming the computer, stopping and restarting it, or changing the time zone need to be done with native Linux tools. But we have just over 194 core cmdlets on all platforms, and more in pre-installed modules. There was a also a big step forward with compatibility in PowerShell 6.1 and another with 6.2 – there is a support for a lot more of the Windows API, so although some things don’t work in Core a lot more does than at first release. It may be necessary to specify the explicit path to the module (the different versions use either “…\WindowsPowerShell\…” or “..\PowerShell\…” in their paths and Windows tools typically install their modules for Windows PowerShell) or to use Import-Module in V6 with the –SkipEditionCheck switch. Relatively few stubbornly refuse to work, and there is a solution for them: remotely run the commands that otherwise are unavailable – instead of going over SSH this time you use WinRM, (V5 doesn’t support SSH) When I started working with constrained endpoints I found I liked the idea of not needing to install modules everywhere and running their commands remotely instead, once you have a PSSession to the place where the commands exist, you can use Get-Module and Import-Module with a –PsSession switch, to make them available. So we can bridge between versions – “the place where the commands exist” is “another version of PowerShell on the same machine” it’s all the same to remoting. The PowerShell team have announced that the next release uses .Net core 3.0 which should mean the return of Out-Gridview (eventually), and other home brew tools to put GUI interfaces onto PowerShell; that’s enough of a change to  bump the major version number, and they will drop “Core” from the name to try to remove the impression that it is a poor relation on Windows. The PowerShell team have a script to do a side by side install of the preview – or even the daily builds – Thomas Lee wrote it up here. Preview 1 seems to have done the important but invisible work of changing .Net version; new commands will come later; but at the time of writing PowerShell 7 preview has parity with PowerShell Core 6, and the goal is parity with Windows PowerShell 5

There is no ISE in PowerShell 6/7, Visual Studio Code had some real annoyances but pretty well all of them have been fixed for some months now and somewhere I joined the majority who see it as the future. Having a Git client built-in has made collaborating on the ImportExcel module so much easier, and that got me to embrace it . Code wasn’t built specifically for PowerShell which means it will work with whichever version(s) it finds.  
imageThe right of the status bar looks like this and clicking the green bit pulls up a menu where you can swap between versions and test what you are writing in each one. These swaps close one instance of PowerShell and open another so you know you’re in a clean environment (not always true with the ISE); the flip side is you realise it is a clean environment when you want something which was loaded in the shell in the shell I’ve just swapped away from.
VS Code’s architecture of extensions means it can pull all kinds of clever tricks – like remote editing –and the Azure plug in allows an Azure Cloud Shell to be started inside the IDE. imageWhen you use Cloud Shell in a browser it has nice easy ways to transfer files; but you can discover the UNC path to your cloud drive with Get-cloudDrive  then , Get-AzStorageAccount will show you a list of accounts, you can work out the name of the account from the UNC path and you use this as the user name to logon but you also need to know the resource group it is in, and Get-AzStorageAccount shows that. Armed with the name and resource group  Get-AzStorageAccountKey gives you one or more keys which can be used as a password, and you can map a drive letter to the cloud drive.

Surely that’s enough shells for one post … well not quite. People have been getting excited about the new Windows Terminal which is went into preview in the Windows store a few hours before I posted this Before that you needed to enable developer options on Windows and build it for yourself. It needs the 1903 Windows update and with that freshly installed I thought “I’ve also got [full] Visual Studio on this machine, why not build and play with Terminal”. As it turns out I needed to add the latest Windows SDK and several gigabytes of options to Visual Studio (all described on the github page), but with that done it was one git command to download the files, another to get submodules, then open visual studio, select the right section per the instructions and say build me an X64 release, have a coffee … and the app appears. (In the limited time I’ve spent with version in store it looks to be the same as the build-your-own version).

imageIt’s nice, despite being early code (no settings menu, just a json file of settings to change)., It’s the first time time Microsoft have put out a replacement for the host which Window uses for command line tools – shells or otherwise, so you could run ssh, ftp, or a tool like netsh in it.  I’ve yet to find a way to have “as admin” and normal processes running in one instance. It didn’t take long for me to add PowerShell on Linux and PowerShell 7 preview to the default choices (it’s easy to copy/paste/adjust the json – just remember to change the guid when adding an new choice, and you can specify the path to a PNG file to use as an icon).
So, in a single window, I have all the shells, except for 32-bit PowerShell 5, as tabs:  CMD, three different, 64-bit versions of PowerShell on Windows, PowerShell on WSL, BASH on WSL, and PowerShell on Linux in Azure.
I must give a shout out to Scott Hanselman for the last one; I was thinking “there must be a way to do what VS code does” and from his post Scott thought down the same lines a little while before me. He hooked up with others working on it and shared the results. I use a 2 line batch file with title and azshell.exe (I’m not sure when “title” crept into CMD, but I’m fairly sure it wasn’t always there. I’ve used it to keep the tab narrow for CMD: to set the tab names for each of the PowerShell versions I set $Host.UI.RawUI.WindowTitle  which even works with from WSL) [UPDATED 3 Aug. Terminal 0.3 has just been releases with an Azure option which starts the cloud shell, but only in its bash incarnation. AzShell.exe can support a choice of shell by specifying –shell pwsh or –shell bash ] 
So I get 7 Shells, 8 if I added the 32 bit version of PowerShell. Running them in the traditional host would give me 16 possible shells. Add the 32 and 64 bit PowerShell ISEs and VS code with Cloud shell and 3 Versions of local PowerShell, and we’re up to 22. And finally there is Azure cloud shell in a browser, or , if you must, the azure phone app, so I get to an nice round two dozen shells in all without ssh’ing into other machines (yes terminal can run ssh) , using any of the alternate Linux shells with WSL or loading all the options VS code has. “Just type the following command line” is not as simple as it used to be.

April 6, 2019

PowerShell functions and when NOT to use them

Filed under: Powershell — jamesone111 @ 3:56 pm

When I was taught to program, I got the message that a function should be a “black box”: we know what goes in one side, what comes out on the other, we don’t care how inputs become outputs. We learn that these “boxes” can leak, a function can see things outside and, in some cases (like connecting to another system) its purpose is to change its environment. But a function shouldn’t manipulate the working variables used by the code which called it. Recently I’ve found myself dealing with PowerShell authors who write like this:

$var_x = 10
$var_y = [math]::pi
do_stuff
$var_i = $var_y * $var_a

We can’t tell from reading this what do_stuff does, it seems to set $var_a because that has magically appeared; but does it use $var_x and $var_y? Does it change them? Will things break if we rename them? The only way to find out is to prise open the box and look inside (read the function definition). If you’re saying “That function can’t change the value of $var_x because it’s not global” here’s a fragment for you to copy and paste:

function do_stuff {
  Set-variable -Scope 1 -Name var_x -Value 30
}

$var_x = 10
do_stuff
$var_x

If the function just set $var_x = $var_x + 20 that would put 30 into a new variable, local to the function  ($var_x += 20 would add 20 to a new local variable, so the result is different). But it didn’t do that, it specifically said “set this variable in the scope 1 above this one”. That’s how things like -ErrorVariable and -WarningVariable work. Incidentally if the command setting the variable is in a function in a module, it is a jump of TWO levels to set things in the scope which called it. Recently I saw a good post from Dave Carrol on using the script scope – which is a de-facto module scope as this older post of Mike’s explains – which can help to avoid this kind of thing.

You might wonder “would someone who doesn’t know how to write a function with parameters really use this…?” I’ve encountered it.
Another case where someone should be using parameters or at least making their variables script-scoped or globally-scoped, was this
Function Use-Data {
   $Y = [int]$data.xvalue * [int]$data.xvalue
   Add-Member -InputObject $data -MemberType NoteProperty -Name Yvalue -Value $y
}

$data = New-object pscustomobject
Add-Member -InputObject $data -MemberType NoteProperty -Name Xvalue -Value $x
Use-Data

Normally we can see the = sign and we know this named place now holds that value. But Set-Variable and Add-Member make that harder to see. We would have one problem fewer to unravel if the writer used $Global:X and $Global:Y.

An example like the last one can be given a meaningful name, modified to take input through parameters and made to return the result properly. But the function is only called from one place. One of the main points of a function is to reduce duplication, but single-use is not an automatic reason to bring a function’s code into the main body of the script which calls it . For example, this:
if (Test-PostalCodeValid $P) {...}
saves me reading code which does the validation – there is no need to know how it does it (the sort of regex used in such cases is better hidden); it is enough that it does: and the function has a single purpose communicated by its name. The problematic functions look like they are the writer’s first mental grouping of tasks (which leads to vague names) and the final product doesn’t benefit from that grouping. The script can’t be understood by reading from beginning to end – it requires the reader to jump back and forth – so flattening the script makes it easier to follow. Because the functions are sets of loosely connected tasks, they don’t have a clear set of inputs or outputs and rely on leakiness.

Replacing a block of code with a black-box whose purpose, inputs and outputs are all clear should make for a better script. And if those things are unclear the script is probably worse for putting things in boxes. You need to call a function many times for the tiny overhead in each call to matter, but I hit such a case while I was working on this post. Some users of Export-Excel work on sheets with over a million cells (I use a 24,000-row x 23 column sheet for tests – 550K cells), and the following code was called for each row of data

$ColumnIndex = $StartColumn
foreach ($Name in $script:Header) {
    Add-CellValue -TargetCell $ws.Cells[$Row, $ColumnIndex] -CellValue $TargetData.$Name
    $ColumnIndex += 1
}   

So, for my big dataset the Add-CellValue function was called 550,000 times which took about 80 seconds in total or 150 microseconds per cell, on my machine. I’d say this fragment is clear and easy to work with: for each name in $header, that property of $targetData is added as a cell-value at the current row and column, and we move to the next column. Add-CellValue handles many different kinds of data – how it does so doesn’t matter. This meets all the rules for a good function. BUT… of that 150μS more than 130 is spent going into and out of the function. That 80 seconds becomes about 8 seconds if I put the function code in the for loop instead of calling out to it. Changes that cut the time to run a script from 0.5sec to 0.4999 sec don’t matter – you can’t use the saved time, and it is better to give up 100μS on each run for the time you save reading clearer code. Changing the time to run scripts from minutes to seconds does matter. So even though using the function was more elegant it wasn’t the best way. As both a computer scientist and an IT practitioner I never forget Jeffrey Snover’s saying Computer scientists want elegant code; IT pros just want to go home.

March 20, 2019

PowerShell Text wrangling [not just] part 4 of the Graph API series

Filed under: Uncategorized — jamesone111 @ 10:00 am

Almost the first line of PowerShell I ever saw was combining two strings like this
"{0} {1}"  -f $x , $y
And my reaction was “What !! If the syntax to concatenate two strings is so opaque this might not be for me”
[Edit as if to prove the awkwardness of the syntax, the initial post had two errors in such a short fragment. Thanks Doug.]
The –f operator is a wrapper for .NETs [String]::format and it is useful, partly for inserting strings into another string. For example I might define a SQL Statement in one place like this:
"Insert Into Users [GivenName], [Surname], [endDate] Values ('{0}', '{1}','{2}') "
and later I can get a ready-to-run query, using  $sqlInsert -f $first,$last,$end  
Doing this lets me arrange a script with long strings placed away from the logic; I’m less happy with this:  

@"Update Users
Set[endDate] = '{0}'
where {1} = '{2}'
And   {3} = '{4}'
"@ -f $end,$fieldName1,$value1,$fieldName2,$value    
because the string is there, my brain automatically goes back and forth filling in what should be in {0}, {1} and {2}, so I’d prefer to put $first, $Last and $end inside one string, or move the string out of sight. A string format operator is there to apply formatting and going over some downloaded code –f let me change this :
$now = Get-Date
$d = $now.Day.ToString()
if ($d.Length -eq 1) {$d ="0$d"}
$m = $now.month
if ($m.Length -eq 1) {$m ="0$m"}
$y = $now.Year
$logMessage = "Run on $d/$m/$y"  

To this:  
$now = Get-Date
$
logMessage
= "Run on {0:d}" –f $now

For years my OneNote notebook has had a page which I lifted from the now-defunct blog of Kathy Kam (which you may still find re-posts of) which explains what the formatting strings are. In this case :d is “local short date” which is better than hard coding a date format; formatting strings used in Excel generally work, but there are some extra single-character formats like :g for general date/time, and :D for long date. If you live somewhere that puts the least significant part of the date in the middle then you might ask ‘Why not use  "Run on $now" ?”    
The 10th day of March 2019 outputs “Run on 03/10/2019 13:48:32” –in most of the world that means “3rd day of October”. But we could use
"Run on $($now.ToString('d'))"
And most people who use PowerShell will have used the $() syntax to evaluate the property of a variable embedded in a string.  But you can put a lot inside $(), this example will give you a list of days:
"Days are $(0..6 | foreach {"`r`n" + $now.AddDays($_).ToString('dddd')})"
The quote marks inside the $() don’t end the string  and  what is being evaluated can run over multiple lines like this
"Days are $(0..6 | foreach {
       "`r`n" +
       $now.AddDays($_).ToString('dddd')
} )"

Again, there are places where this I have found this technique to be useful, but encountering it in an unfamiliar piece of script means it takes me a few seconds to see that "`r`n" is a string, inside a code block, inside a string, in my script. I might use @" … "@  , which I think was once required for multi-line strings, instead of "…" which certainly works now, but leaves me looking for the closing quote – which isn’t the next quote. If the first part of the string was set and then a loop added days to the string that would be easier to follow. Incidentally when I talk of “an unfamiliar piece of script ” I don’t just mean other peoples work, I include work I did long enough ago that I don’t remember it.

Embedding in a string, concatenating multiple strings, or using –f  might all work, so which one is best in a given situation varies (sometimes it is shortest code that is easiest to understand and other things are clearer spread over a few lines) and the choice often comes down to personal coding style.
When working on my Graph API module I needed to send JSON like this (from the Microsoft Documentation) to create a group :

{
  "description": "Group with designated owner and members",
  "displayName": "Operations group",
  "groupTypes": [
    "Unified"
  ],
  "mailEnabled": true,
  "mailNickname": "operations2019",
  "securityEnabled": false,
  "owners@odata.bind": [
    "https://graph.microsoft.com/v1.0/users/26be1845-4119-4801-a799-aea79d09f1a2"
  ],
  "members@odata.bind": [
    "https://graph.microsoft.com/v1.0/users/ff7cb387-6688-423c-8188-3da9532a73cc",
    "https://graph.microsoft.com/v1.0/users/69456242-0067-49d3-ba96-9de6f2728e14"
  ]
}

This might be done as a large string with embedded variables, and even a couple of embedded for loops like the previous example, or to I could build the text up a few lines at a time. Eventually I settled on doing it like this.
$settings = @{'displayName'     = $Name
              'mailNickname'    = $MailNickName
              'mailEnabled'     = $true
              'securityEnabled' = $false
              'visibility'      = $Visibility.ToLower()
              'groupTypes'      = @('Unified')
}
if ($Description) {$settings['description']        = $Description  }
if ($Members)     {$settings['members@odata.bind'] = @() + $Members}
if ($Owners)      {$settings['owners@odata.bind']  = @() + $Owners }

$json = ConvertTo-Json $settings
Write-Debug $json
$group = Invoke-RestMethod @webparams -body $json

ConvertTo-Json only processes two levels of hierarchy by default so when the Hash table has more layers it needs the –DEPTH parameter to translate properly. Why do it this way? JSON says ‘here is something (or a collection of things) with a name’, so why say that in PowerShell-speak only to translate it? Partly it’s keeping to the philosophy of only translating into text at last moment; partly it’s getting rid of the mental context-switching – this is script, this is text with script-like bits . Partly it is to make getting things right easier than getting things wrong: if things are built up a few lines at a time,  I need to remember that ‘Unified’ should be quoted, but as a Boolean value ‘false’ should not, I need to track unclosed quotes and brackets, to make sure commas are where they are needed and nowhere else: in short, every edit is a chance to turn valid JSON into something generates a “Bad Request” message – so everywhere I generate JSON I have Write-Debug $Json. But any syntax errors in that hash table will be highlighted as I edit it.
And partly… When it comes to parsing text, I’ve been there and got the T-Shirts; better code than mine is available, built-in with PowerShell; I’d like apply the same logic to creating such text: I want to save as much effort as I can between “I have these parameters/variables” and “this data came back”. That was the thinking behind writing my GetSQL module: I know how to connect to a database and can write fairly sophisticated queries, but why keep writing variations of the same few simple ones, and the connection to send them to the database? SQL statements have the same “context switch” – if I type “–eq” instead of “=” in a query it’s not because I’ve forgotten the SQL I learned decades ago. Get-SQL lets me keep my brain in PowerShell mode and write.  
Get-SQL –Update LogTable –set Progess –value 100 –where ID –eq $currentItem

My perspective – centred on the script that calls the API rather than the API or its transport components – isn’t the only way. Some people prize the skill of handwriting descriptions of things in JSON. A recent project had me using DSC for bare-metal builds (I need need to parse MOF files to construct test scripts, and I could hand crank MOF files, but why go through that pain? ); DSC configuration functions take a configuration data parameter which is a hash holding all the details of all the machines. This was huge. When work started it was natural to create a PowerShell variable holding the data but when it became hundreds of lines I moved that data to its own file but it remained a series of declarations which could be executed – this is the code which did that

Get-ChildItem -Path (Join-Path -Path $scriptPath -ChildPath "*.config.ps1") | ForEach-Object {
    Write-Verbose -Message "Adding config info from $($_.name)"
    ConfigurationData.allNodes += (& $_.FullName )
}

– there was no decision to store data as PowerShell declarations it just happened as a accident of how the development unfolded, and there were people working on that project who found JSON easier to read (we could have used any format which supports a hierarchy). So I added something to put files through ConvertFrom-JSon and convert the result from a PSCustomObject to a hash table so they could express the data in the way which seemed natural to them.

Does this mean data should always be shifted out of the script ? Even that answer is “it depends” and is influenced by personal style. The examples which Doug Finke wrote for the ImportExcel module often start like this:

$data = ConvertFrom-Csv @'
Item,Quantity,Price,Total Cost
Footballs,9,21.95,197.55
...
Baseball Bats,38,159.00,6042.00
'@

Which is simultaneously good and bad. It is placed at the the start of the file not sandwiched between lumps of code, we can see that it is data for later and what the columns are, and it is only one per row of data where JSON would be 6 lines. But csv gives errors a hiding place – a mistyped price, or an extra commas is hard to see. But that doesn’t matter in this case. But we wouldn’t mash together the string being converted from other data… would we ?

March 6, 2019

PowerShell formatting [not just] Part 3 of the Graph API series

Filed under: Microsoft Graph,Powershell — jamesone111 @ 8:12 am

Many of us learnt to program at school and lesson 1 was writing something like

CLEARSCREEN
PRINT “Enter a number”    
INPUT X
Xsqrd = X * X
PRINT “The Square of ” + STR(X) + “Is ” + STR(Xsqrd)

So I know I should not be surprised when I read scripts and see someone has started with CLS (or Clear-Host) and then has a script peppered with Read-Host and Write-Host, or perhaps echo – and what is echoed is a carefully built up string. And I find myself saying “STOP”

  • CLS I might have hundreds or thousands of lines in the scroll back buffer of my shell. Who gave you permission to throw them away ?
  • Let me  run your script with parameters. Only use commands like Read-Host and Get-Credential if I didn’t (or couldn’t) provide the parameter when I started it
  • Never print your output

And quite quickly most of us learn about Write-Verbose, and Write-Progress and the proper way to do “What’s happening messages” ; we also learn to Output an object, not formatted text. However, this can have a sting in the tail: the previous post showed this little snipped of calling the graph API.

Invoke-Restmethod -Uri "https://graph.microsoft.com/v1.0/me" -Headers $DefaultHeader

@odata.context    : https://graph.microsoft.com/v1.0/$metadata#users/$entity
businessPhones    : {}
displayName       : James O'Neill
givenName         : James
jobTitle          :
mail              : xxxxx@xxxxxx.com
mobilePhone       : +447890101010
officeLocation    :
preferredLanguage : en-GB
surname           : O'Neill
userPrincipalName : xxxxx@xxxxxx.com
id                : 12345678-abcd-6789-ab12-345678912345

Invoke-RestMethod  automates the conversion of JSON into a PowerShell object; so I have something rich to output but I don’t want all of this information, I want a function which works like this

> get-graphuser
Display Name  Job Title  Mail  Mobile Phones UPN
------------  ---------  ----  ------------- ---
James O'Neill Consultant jxxx  +447890101010 Jxxx

If no user is specified my function selects the current user. If I want a different user I’ll give it a –UserID parameter, if I want something about a user I’ll give it other parameters and switches, but if it just outputs a user I want a few fields displayed as a table. (That’s not a real phone number by the way). This is much more the PowerShell way, think about what it does, what goes in and what comes out, but a vaguer about the visuals of that output.

A simple, but effective way get this style of output would be to give Get-GraphUser a –Raw switch and pipe the object through Format-Table, unless raw output is needed; but I need repeat this anywhere that I get a user, and it only works for immediate output. If I do
$U = Get-GraphUser
<<some operation with $U>>

and later check what is in the variable it will output in the original style. If I forget –RAW, $U won’t be valid input… There is a better way and to tell PowerShell “When you see a Graph user format it as a table like this” ; that’s done with a format.ps1xml file – it’s easiest to plagiarize the ones in $PSHOME directory – don’t modify them, they’re digitally signed – you get an XML file which looks like this

<Configuration>
    <ViewDefinitions>
        < View>
            <Name>Graph Users</Name>
            <ViewSelectedBy><TypeName>GraphUser</TypeName></ViewSelectedBy>   
            <TableControl>

                ...

            </TableControl>
        </View>     
    </ViewDefinitions>
< /Configuration>

There is a <view> section for each type of object and a <tableControl> or <listControl> defines how it should be displayed. For OneDrive objects I copied the way headers work for files, but everything else just has a table or list.  The XML says the view is selected by an object with a type name of GraphUser, and we can add any name to the list of types on an object. The core of the Get-GraphUser function looks like this:

$webparams = @{Method = "Get"
              Headers = $Script:DefaultHeader
}

if ($UserID) {$userID = "users/$userID"} else {$userid = "me"}

$uri = "https://graph.microsoft.com/v1.0/$userID"
#Other URIs may be defined 

$results = Invoke-RestMethod -Uri $uri @webparams

foreach ($r in $results) {
   if ($r.'@odata.type' -match 'user$')  {
        $r.pstypenames.Add('GraphUser')
    }
    ...
}

$results

The “common” web parameters are defined, then the URI is determined, then a call to Invoke-RestMethod, which might get one item, or a array of many (usually in a values property). Then the results have the name “GraphUser” added to their list of types, and the result(s) are returned. 

This pattern repeats again and again, with a couple of common modifications ; I can use Get-GraphUser <id> –Calendar to get a user’s calendar, but the calendar that comes back doesn’t contain the details needed to fetch its events. So going through the foreach loop, when the result is a calendar it is better for the function to add a property that will help navigation later

$uri = https://graph.microsoft.com/v1.0/$userID/Calendars

$r.pstypenames.Add('GraphCalendar')
Add-Member -InputObject $r -MemberType NoteProperty -Name CalendarPath -Value "$userID/Calendars/$($r.id)"
  

As well as navigation, I don’t like functions which return things that need to be translated, so when an API returns dates as text strings I’ll provided an extra property which presents them as a datetime object. I also create some properties for display use only, which comes into its own for the second variation on the pattern. Sometimes it is simpler to just tell PowerShell – “Show these properties” when there is no formatting XML PowerShell has one last check – does the object have a PSStandardMembers property with a DefaultDisplayPropertySet child property ? For events in the calendar, the definition of “standard members” might look like this:

[string[]]$defaultProperties = @('Subject','When','Reminder')
$defaultDisplayPropertySet = New-Object System.Management.Automation.PSPropertySet`
             -ArgumentList 'DefaultDisplayPropertySet',$defaultProperties
$psStandardMembers = [System.Management.Automation.PSMemberInfo[]] @($defaultDisplayPropertySet)

Then, as the function loops through the returned events instead of adding a type name it adds a property named PSStandardMembers

Add-Member -InputObject $r -MemberType MemberSet  -Name PSStandardMembers -Value $PSStandardMembers

PowerShell has an automatic variable $FormatEnumerationLimit  which says “up to some number of properties display a table, and for more than that display a list” – the default is 4. So this method suits a list of reminders in the calendar where the ideal output is a table with 3 columns, and there is only one place which gets reminders. If the same type of data is fetched in multiple places it is easier to maintain a definition in an XML file.

As I said before working on the graph module the same pattern is repeated a lot:  discover a URI which can get the data, then write a PowerShell function which:

  • Builds the URI from the function’s parameters
  • Calls Invoke-RestMethod
  • Adds properties and/or a type name to the returned object(s)
  • Returns those objects

The first working version of a new function helps to decide how the objects will be formatted which refines the function and adds to the formatting XML as required. Similarly the need for extra properties might only become apparent when other functions are written; so development is an iterative process.   

The next post will look at another area which the module uses, but applies more widely which I’ve taken to calling “Text wrangling”,  how we build up JSON and other text that we need to send in a request.

March 3, 2019

PowerShell and the Microsoft Graph API : Part 2 – Starting to explore

Filed under: Azure / Cloud Services,Office 365,Powershell — jamesone111 @ 12:21 pm

In the previous post I looked at logging on to use Graph – my msftgraph module has a Connect-MsGraph function which contains all of that and saves refresh tokens so it can get an access token without repeating the logon process, it also refreshes the token when its time is up. Once I have the token I can start calling the rest API. Everything in graph has a URL which looks like

"https://graph.microsoft.com/version/type/id/subdivision"

Version is either “V1.0” or “beta” ; the resource type might be “user” or “group”, or “notebook” and so on and a useful one is “me”; but you might call user/ID to get a different user. to get the data you make an HTTP GET request which returns JSON; to add something it is usually a POST request with the body containing JSON which describes what you want to add, updates happen with a PATCH request (more JSON), and DELETE requests do what you’d expect. Not everything supports all four – there are a few things which allow creation but modification or deletion are on someone’s to do list. 

The Connect-MsGraph function runs the following so the other functions can use the token in whichever way is easiest:

if ($Response.access_token) {
    $Script:AccessToken     = $Response.access_token
    $Script:AuthHeader      = 'Bearer ' + $Response.access_token
    $Script:DefaultHeader   = @{Authorization = $Script:AuthHeader}
}

– by using the script: scope they are available throughout the module, and I can I run

$result = Invoke-WebRequest -Uri "https://graph.microsoft.com/v1.0/me" -Headers $DefaultHeader

Afterwards, $result.Content will contain this block of JSON
{ "@odata.context": "https://graph.microsoft.com/v1.0/$metadata#users/$entity", "businessPhones": [], "displayName": "James O'Neill", "givenName": "James", "jobTitle": null, "mail": "xxxxx@xxxxxx.com", "mobilePhone": "+447890101010", "officeLocation": null, "preferredLanguage": "en-GB", "surname": "O'Neill", "userPrincipalName": "xxxxx@xxxxxx.com", "id": "12345678-abcd-6789-ab12-345678912345" }

It doesn’t space it out to make it easy to read. There’s a better way: Invoke-RestMethod creates a PowerShell object like this 

Invoke-Restmethod -Uri "https://graph.microsoft.com/v1.0/me" -Headers $DefaultHeader

@odata.context    : https://graph.microsoft.com/v1.0/$metadata#users/$entity
businessPhones    : {}
displayName       : James O'Neill
givenName         : James
jobTitle          :
mail              : xxxxx@xxxxxx.com
mobilePhone       : +447890101010
officeLocation    :
preferredLanguage : en-GB
surname           : O'Neill
userPrincipalName : xxxxx@xxxxxx.com
id                : 12345678-abcd-6789-ab12-345678912345

Invoke-RestMethod  automates the conversion of JSON into a PowerShell object; so
$D = Invoke-Restmethod -Uri "https://graph.microsoft.com/v1.0/me/drive" -Headers $DefaultHeader    
lets me refer to $D.webUrl to get the path to send a browser to to see my OneDrive. It is quite easy out what to do with the objects which come back from Invoke-RestMethod; arrays tend to come back in a .value property, some data is paged and gives a property named ‘@odata.nextLink’  , others objects – like “me” give everything on the object. Writing the module I added some formatting XML so PowerShell would display things nicely. The  The work is discovering URIs that available to send a GET to, and what extra parameters can be used – this isn’t 100% consistent – especially around adding query parameters to the end of a URL (some don’t allow filtering, some do but it might be case sensitive or insensitive, it might not combine with other query parameters and so on) and although the Microsoft documentation is pretty good, in some places it does feel like a work in progress. I ended up drawing a map and labelling it with the functions I was building in the module – user related stuff is on the left, teams and groups on the right and things which apply to both are in the middle. The Visio which this is based on an a PDF version of it are in the Repo at  https://github.com/jhoneill/MsftGraph 

Relationships 

Once you can make your first call to the API the same techniques come up again and again , and future posts will talk how to get PowerShell formatting working nicely, and how to create JSON for POST requests without massive amounts of “text wrangling” But as  you can see from the map there are many rabbit holes to go down, I started with a desire to post a message to a channel in Teams. Then I saw there was support for OneDrive and OneNote , and work I had done on them in the past called out for re-visit. Once I started working with OneDrive I wanted tab completion to expand files and folders, so I had to write an argument completer … and every time I looked at the documentation I saw “There is this bit you haven’t done” so I added more (I don’t have anywhere to experiment with  Intune so that is conspicuous by its absence, but I notice other people have worked on that), and that’s how we end up with big software projects … and patterns I used will come up in those future posts.

February 28, 2019

PowerShell and the Microsoft Graph API : Part 1, signing in

Filed under: Azure / Cloud Services,Microsoft Graph,Office,Office 365,Powershell — jamesone111 @ 6:13 pm

I recently I wanted a script to be able to post results to Microsoft teams,  which led me to the Microsoft Graph API which is the way to interact with all kinds of Microsoft Cloud services, and the scope grew to take in OneNote, OneDrive, SharePoint, Mail, Contacts, Calendars and Planner as well. I have now put V1.0 onto the PowerShell Gallery , and this is the first post on stuff that has come out of it.

if you’ve looked at anything to do with the Microsoft Graph API, a lot things say “It uses OAuth, and here’s how to logon”. Every example seems to log on in a different way (and the authors seem to think everyone knows all about OAuth). So I present… fanfare … my ‘definitive’ guide to logging on. Even if you just take the code I’ve shared, bookmark this because at some point someone will say  What’s Oauth about ?  The best way to answer that question is with another question: How can a user of a service allow something to interact with parts of that service on their behalf?  For example, at the bottom of this page is a “Share” section, WordPress can tweet on my behalf; I don’t give WordPress my Twitter credentials, but I tell Twitter “I want WordPress to tweet for me”. There is a scope of things at Twitter which I delegate to WordPress.  Some of the building blocks are

  • Registering applications and services which permission will be delegated to, and giving them a unique ID; this allows users to say “This may do that”, “Cancel access for that” – rogue apps can be de-registered.  
  • Authenticating the user (once) and obtaining and storing their consent for delegation of some scope.
  • Sending tokens to delegates – WordPress sends me to Twitter with its ID; I have a conversation with Twitter, which ends with “give this to WordPress”.

Tokens help when a service uses a REST API, with self-contained calls. WordPress tells Twitter “Tweet this” with an access token which says who approved it to post. The access token is time limited and a refresh token can extend access without involving the user (if the user agrees that the delegate to should be allowed to work like that).

Azure AD adds extra possibilities and combined with “Microsoft Accounts”, Microsoft Graph logons have a lot permutations.

  1. The application directs users to a web login dialog and they log on with a “Microsoft Account” from any domain which is not managed by Office 365 (like Gmail or Outlook.com). The URI for the login page includes the app’s ID and the the scopes it needs; and if the app does not have consent for those scopes and that user, a consent dialog is displayed for the user to agree or not. If the logon is completed, a code is sent back. The application presents the code to a server and identifies itself and gets the token(s). Sending codes means users don’t hold their own tokens or pass them over insecure links.
  2. From the same URI as option 1, the user logs on with an Azure AD account a.k.a. an Office 365 “Work or school” account; Azure AD validates the user’s credentials, and checks if there is consent for that app to use those scopes.  Azure AD tracks applications (which we’ll come back to in a minute) and administrators may ‘pre-consent’ to an application’s use of particular scopes, so their users don’t need to complete the consent dialog. Some scopes in Microsoft Graph must be unlocked by an administrator before they can appear in a consent dialog

clip_image002For options 1 & 2 where the same application can be used by users with either Microsoft or Azure-AD accounts,  applications are registered at https://apps.dev.microsoft.com/ (see left). The application ID here can be used in a PowerShell script.

Azure AD learns about these as they are used and shows them in the enterprise applications section of the Azure Active imageDirectory Admin Center. The name and the GUID from the App registration site appear in Azure and clicking through shows some information about the app and leads to its permissions.  (See right)

The Admin Consent / User consent tabs in the middle allow us to see where individual users have given access to scopes from a consent dialog, or see and change the administrative consent for all users in that Azure AD tenant.

The ability for the administrator to pre-consent is particularly useful useful with some of the later scenarios, which use a different kind of App, which leads to the next option…

  1. The App calls up the same web logon dialog as the first two options except the logon web page is tied to specific Azure AD tenant and doesn’t allow Microsoft accounts to log on. The only thing which has changed between options 2 and 3 is the application ID in the URI.
    This kind of logon is associated with an app which was not registered at https://apps.dev.microsoft.com/ but from the App Registrations section of the Azure Active Directory Admin Center. An app registered there is only known to oneimage AAD tenant so when the general-purpose logon page is told it is using that app it adapts its behaviour.
    Registered apps have their own Permissions page, similar to the one for enterprise apps; you can see the scopes which need admin consent (“Yes” appears towards the right).
  2. When Azure AD stores the permitted Scopes for an App, there is no need to interact with the user (unless we are using multi-factor authentication) and the user’s credentials can go in a silent HTTPS request. This calls a different logon URI with the tenant identity embedded in it – the app ID is specific to the tenant and if you have the app ID then you have the tenant ID or domain name to use in the login URI.
  3. All the cases up to now have been delegating permissions on behalf of a user, but permissions can be granted to an Azure AD application itself (in the screen shot on the right user.read.all is granted as a delegated permission and as an Application Permission). The app authenticates itself with a secret which is created for it in the Registered Apps part of the Azure AD admin Center. The combination of App ID and Secret is effectively a login credential and needs to be treated like one.

Picking how an app logs on requires some thought.

Decision Result Options
Will it work with “Live” users’ Calendars, OneDrive, OneNote ? It must be a General app and use the Web UI to logon. 1 or 2
Is all its functionality Azure AD/Office 365 only (like Teams) ?
or is the audience Office 365 users only ?
It can be either a General or Azure AD App,
(if general is used, Web UI must be used to logon).
1-4
Do we want users to give consent for the app to do its work ? It must use the Web UI. 1-3
Do we want avoid the consent dialog ? It must be an Azure AD app and use a ‘Silent’ http call to the Tennant-specific logon URI. 4
Do we want to logon as the app rather than a user ? It must be an Azure AD app and use a ‘Silent’ http call to the Tennant-specific logon URI. 5

Usually when you read about something which uses graph the author doesn’t explain how they selected a logon method – or that other ways exist. For example the Exchange Team Blog has a step-by-step example for an app which logs on as itself.  (Option 5 above). The app is implemented in PowerShell and the logon code the boils down to this:

$tenant    = 'GUID OR Domain Name'
$appId     = 'APP GUID'
$appSecret = 'From Certificates and Secrets'
$URI       = 'https://login.microsoft.com/{0}/oauth2/token' -f $tenant

$oauthAPP  = Invoke-RestMethod -Method Post -Uri $URI -Body @{
        grant_type    = 'client_credentials';
        client_id     =  $appid ;
        client_secret =  $appSecret;
        resource      = 'https://graph.microsoft.com';
}

After this runs $oauthApp has an access_token property which can be used in all the calls to the service.
For ease of reading here the URI is stored in a variable, and the Body parameter is split over multiple lines, but the Invoke-RestMethod command could be a single line containing the URI with the body on one line

Logging on as the app is great for logs (which is what that article is about) but not for “Tell me what’s on my one drive”; but that code can quickly be adapted for a user logon as described in Option 4 above, we keep same tenant, app ID and URI and change the grant type to password and insert the user name and password in place of the app secret, like this:

$cred      = Get-Credential -Message "Please enter your Office 365 Credentials"
$oauthUser = Invoke-RestMethod -Method Post -Uri $uri -Body  @{
        grant_type = 'password';
        client_id  =  $clientID;
        username   =  $cred.username;
        password   =  $cred.GetNetworkCredential().Password;
        resource   = 'https://graph.microsoft.com';
}

Just as an aside, a lot of people “text-wrangle”  the body of their HTTP requests, but I find it easier to see what is happening by writing a hash table with the fields and leave it to the cmdlet to sort the rest out for me; the same bytes go on the wire if you write
$oauthUser = Invoke-RestMethod -Method Post -Uri $uri -ContentType  "application/x-www-form-urlencoded"
-body
"grant_type=password&client_id=$clientID&username=$($cred.username)&password=$($cred.GetNetworkCredential().Password)&resource=https://graph.microsoft.com"

As with the first example, the object returned by Invoke-RestMethod, has the access token as a property so we can do something like this

$defaultheader = @{'Authorization' = "bearer $($oauthUser.access_token)"}
Invoke-RestMethod -Method Get -Uri https://graph.microsoft.com/v1.0/me

I like this method, because it’s simple, has no dependencies on other code, and runs in both Windows-PowerShell and PowerShell-core (even on Linux).
But it won’t work with consumer accounts. A while back I wrote something which built on this example from the hey scripting guy blog which displays a web logon dialog from PowerShell; the original connected to a login URI which was only good for Windows Live logins – different examples you find will use different end points – this page gave me replacement ones which seem to work for everything .

With $ClientID defined as before and a list of scopes in $Scope the code looks like this

Add-Type -AssemblyName System.Windows.Forms
$CallBackUri = "https://login.microsoftonline.com/common/oauth2/nativeclient"
$tokenUri    = "https://login.microsoftonline.com/common/oauth2/v2.0/token"
$AuthUri     = 'https://login.microsoftonline.com/common/oauth2/v2.0/authorize' +
                '?client_id='    +  $ClientID           +
                '&scope='        + ($Scope -join '%20') +
                '&redirect_uri=' +  $CallBackUri        +
                '&response_type=code'


$form     = New-Object -TypeName System.Windows.Forms.Form       -Property @{
                Width=1000;Height=900}
$web      = New-Object -TypeName System.Windows.Forms.WebBrowser -Property @{
                Width=900;Height=800;Url=$AuthUri }
$DocComp  = { 
    $Script:uri = $web.Url.AbsoluteUri
    if ($Script:Uri -match "error=[^&]*|code=[^&]*") {$form.Close() }
}
$web.Add_DocumentCompleted($DocComp) #Add the event handler to the web control
$form.Controls.Add($web)             #Add the control to the form
$form.Add_Shown({$form.Activate()})
$form.ShowDialog() | Out-Null

if     ($uri -match “error=([^&]*)”) {
    Write-Warning (“Logon returned an error of “ + $Matches[1])
    Return
}
elseif ($Uri -match “code=([^&]*)” ) {# If we got a code, swap it for a token
    $oauthUser = Invoke-RestMethod -Method Post -Uri $tokenUri  -Body @{
                   ‘grant_type’  =‘authorization_code’;
‘code’       
= $Matches[1];
                   ‘client_id’   = $Script:ClientID;
‘redirect_uri’
= $CallBackUri
}
}

This script uses Windows Forms which means it doesn’t have the same ability to run everywhere; it defines a ‘call back’ URI, a ‘token’ URI and an ‘authorization URI’. The browser opens at the authorization URI, after logging on the server sends their browser to callback URI with code=xxxxx  appended to the end the ‘NativeClient’ page used here does nothing and displays nothing, but the script can see the browser has navigated to somewhere which ends with code= or error=, it can pick out the code and and it to the token URI. I’ve built the Authorization URI in a way which is a bit laborious but easier to read; you can see it contains list of scopes separated by spaces, which have to be escaped to “%20” in a URI, as well as the client ID – which can be for either a generic app (registered at apps.dev.microsoft.com) or an azure AD app.

The  middle part of the script creates a the windows form with a web control which points at the authorization URI, and has a two line script block which runs for the “on_DocumentCompleted” event, it knows the login process is complete when the browser’s URI contains either with a code or an error when it sees that, it makes the browser’s final URI available and closes the form.
When control comes back from the form the If … ElseIf checks to see if the result was an error or a code. A code will be posted to the token granting URI to get the Access token (and refresh token if it is allowed). A different post to the token URI exchanges a refresh token for a new access token and a fresh refresh token.
To test if the token is working and that a minimum set of scopes have been authorized we can run the same script as when the token was fetched silently.

$defaultheader = @{'Authorization' = "bearer $($oauthUser.access_token)"}
Invoke-RestMethod -Method Get -Uri https://graph.microsoft.com/v1.0/me

And that’s it.

In the next part I’ll start looking at calling the rest APIs, and what is available in Graph.

January 30, 2019

PowerShell. Don’t Just Throw

Filed under: Powershell — jamesone111 @ 3:17 pm

I write  “ ;return ” every time that I put throw in my PowerShell scripts. I didn’t always do it. Sooner or later I’ll need to explain why.

First off: when something throws an error it is kind-of ugly, and it can stop things that we don’t to be stopped, sometimes Write-Warning is better than throw.  But many (probably most) people don’t realise the assumption they’re making when they use throw

Here’s a simple function to demonstrate the point
function test {
    [cmdletbinding()]
    Param([switch]$GoWrong)
    Write-verbose "Starting ..."
    if ($GoWrong) {
        write-host "Something bad happened"
        throw "Failure message"
    }
    else {
        Write-Host "All OK So Far"
    }
    if ($GoWrong) {
        write-host "Something worse happens. "
    }
    else {
        Write-Host "Still OK"
    }

}
So some input causes an issue and to prevent things getting worse, the function throws an error. I think almost everyone has written something like this (and yes, I’m using Write-Host – those messages are decoration for the user to look at not output , I could use Write-Verbose with –Verbose but then I’d have to explain… )

I can call the function

>test
All OK So Far
Still OK
 
or like this

>test -GoWrong
Something bad happened
Failure message
At line:9 char:9
+         throw "Failure message"

Exactly what’s expected – where’s the problem? no need to put a return in is there ?
Someone else takes up the function and they write this.

Function test2 {
    Param([switch]$Something)
    $x = 2 + 2 #Really some difficult operation 
    test -GoWrong:$Something
    return $x
}

This function does some work, calls the other function and returns a result

>Test2
All OK So Far
Still OK
4

But some input results in a problem.

>test2 -Something
Something bad happened
Failure message
At line:9 char:9
+         throw "Failure message"
 
That throw in the first function was for protection but it has lost some work. And the author of Test2 doesn’t like big lumps of “blood” on the screen. What would you do here? I know what I did, and it wasn’t to say “Oh somebody threw something, so I should try to catch it” and start wrapping things in Try {} Catch {}. I said “One quick change will fix that!” 

    test -GoWrong:$Something -ErrorAction SilentlyContinue

Problem solved.

What do you think happens if I run that command again; I’m certain a lot of  people will get the answer wrong, and I’m tempted to say copy the code into PowerShell and try it, so that you don’t read ahead and see what happens without thinking about it for a little bit.  Maybe if I waffle for a bit… Have you thought about it ? This is what happens.  

>test2 -Something
Something bad happened
Something worse happens.
4

The change got rid of the ‘blood’, and the result came back. But… the second message got written – execution continued into exactly the bit of code which had to be prevented from running. Specifying the error action stopped the throw doing anything.

Discovering that made me put a return after every throw, even though it should be redundant more than 99% of the time. And I now think any test of error handling should include changing the value of $ErrorActionPreference.

November 15, 2018

Putting Out-Printer back into PowerShell 6.1

Filed under: Powershell — jamesone111 @ 11:10 pm

One of the things long term PowerShell folk have to get on top of is the move from Windows PowerShell (up to V5.1) to PowerShell Core (V6 and beyond). PowerShell Core uses .NET core which is a subset that is available cross platform. Having a “Subset” means we pay a price for getting PowerShell on Linux, things in Windows-PowerShell which used parts not in the subset went missing from PowerShell 6 on Windows. When PowerShell 6.1 shipped the release notes said

On Windows, the .NET team shipped the Windows Compatibility Pack for .NET Core, a set of assemblies that add a number of removed APIs back to .NET Core on Windows.
We’ve added the Windows Compatibility Pack to PowerShell Core 6.1 release so that any modules or scripts that use these APIs can rely on them being available.

When they say “a number of”, I don’t know how big the number is, but I suspect it is a rather bigger and more exciting number than this quite modest statement suggests. The team blog says 6.1 gives Compatibility with 1900+ existing cmdlets in Windows 10 and Windows Server 2019, though they don’t give a breakdown of what didn’t work before, and what still doesn’t work.

But one command which is still listed as missing is Out-Printer. Sending output to paper might cause some people to think “How quaint”  but the command is still useful, not least because “Send to One note” and “Print to PDF” give a quick way of getting things into a file. In Windows PowerShell Out-Printer is in the Microsoft.PowerShell.Utility system module, but it has gone in PowerShell core. So I thought I would try to put it back. The result is named 6Print and you can install it from the PowerShell gallery (Install-Module 6print). It only works with the Windows version of PowerShell – .NET core on Linux doesn’t seem to have printing support. I’ve added some extra things to the original, you can now specify:

  • -PaperSize and –Landscape, -TopMargin, –BottonMargin, –LeftMargin and –RightMargin to set-up the page
  • -FontName and –FontSize, to get the print looking the way you want.
  • -PrintFileName  (e.g to specify the name of a PDF you are printing to)
  • -Path and -ImagePath although you would normally pipe input into the command (or pass the input as –inputObject) you can also specify a text file with -Path or a BMP, GIF, JEPG, PNG, TIFF file with –ImagePath

As well as –Name, –Printer or –PrinterName to select the printer (a little argument completer will help you fill in the name).

I may try to get this added to the main PowerShell project when it has had some testing. Because so many more things now work you can load the CIM cmdlets for print management with Import-Module -SkipEditionCheck PrintManagement.

it will install on PowerShell 5.1 if you want the extra options.

July 30, 2018

On PowerShell Parameters

Filed under: Powershell — jamesone111 @ 2:53 pm

When I talk about rules for good, reusable, PowerShell I often say “Parameters should be flexible …… so should constants.

The second half of that is a reminder that the first step from something quickly hacked together, towards something sharable is moving some key assignment statements to the top of the script, then putting param( ) around them and commas between them. Doing that means the  = whatever  part is setting the default for a parameter which can be changed at runtime. 

Good parameters allow the user to pipe input into commands, to provide an object or a name which allows the object to be fetched, they support multiple targets from one command (e.g. Get the contents of multiple files) and they help intellisense to suggest values to the user (validationSets, enum types and argument completers all help with that). I thought I did a good job with parameters most of the time – until someone commenting on work I’d contributed to Doug Finke’s ImportExcel  module showed me I wasn’t being as flexible as I should be, and how I had developed a bad habit.

The first thing to mention is that PowerShell is different to most other languages when it comes to labelling parameters with a type. In other places doing that means “this must be an X”; but if you write this in PowerShell:
Param (
   $p
  [int]$h,
  [boolean]$b,
  [EnumType]$e
)

It means “Try to make h an int, try to make b a boolean… don’t bother trying to P into anything”  and passing –h “Hello”  doesn’t cause a  “Type Mismatch Error” which other languages would throw, but PowerShell says ‘Cannot convert value "Hello" to type "System.Int32"’

in that example, none of the parameters is mandatory, and if none is specified PowerShell tries to convert the empty values: the Integer parameter – becomes zero, the boolean becomes false, and an enum type, will fail silently. This means we can’t tell from the value of $h or $b if the user wanted to change things to zero and false or they wanted things to be left as they are. We can use [Nullable[Boolean]] and [Nullable[Int]] and then code must allow for three states – the following will run code that we don’t want to be run when $b is null.
if ($b) {do something}
else    {do something different}

it needs to be something like  
# $b can be true, false or null
if     ($b) {do something}
elseif ($null –ne $b) {do something different}

I don’t like using Boolean parameters: when something is a “Do or Do not” choice like “Append” or “Force”* we would never specify –Append $false or –Force $false – so typing “True” is redundant.
The function in question sets formatting so I have
Param (            
  [int]$height,
  [switch]$bold,
  [switch]$italic,
  [switch]$underline,
  [EnumType]$alignment 
)
if ($bold)      {$row.bold      = $true}
if ($italic)    {$row.italic    = $true}
if ($underline) {$row.underline = $true}

This where my bad habit creeps in … at first sight there is nothing wrong with carrying on like this… 
if ($alignment) {$row.alignment = $alignment}
if ($height)    {$row.height    = $height   }

I test this by setting alignment to bottom and height to 20: everything works, and the code sets off into the world.   
Then the person who was testing my code said “I can’t set the height to zero” . My test can’t differentiate between “blank” and “zero”. Not allowing height to be zero might be OK, but there was worse to come: alignment is an Enum type
Top    = 0
Center = 1
Bottom = 2

etc.

Because “Top” is zero it is treated as false , so the code above works except when “top” is chosen. I need to use better tests.
The new test solved the next problem: my tester said “I can’t remove bold” . Of course, I had seen bold as “Do , or Do not. There is no un-do.”; because the main task of the code is to create new Excel sheets it will setting bold etc… almost exclusively.  And “Almost” is a nuisance.

I don’t want to change these parameters to Booleans because (a) it will break a lot of existing things and (b) it feels wrong to make everyone add “  $true” because a few sometimes use “ $false”. The  parameter list is already overcrowded so I don’t want to add -noBold –noUnderline and so on ; I’d need to figure out what to do about –bold and –notbold being specified together.  The least-inelegant solution I could come up with was based on a little used feature of switches…

Switch parameters are used without a value, if specified they are treated as true. But very early in my PowerShell career, I had a function which took a couple of switches which needed to be passed on to another command. I asked some kind soul (I forget who) how to do this and they said call the second command with –SecondSwitch:$FirstSwitch (in fact you can write any PowerShell parameter with a colon between the name and the value, instead of the conventional space) . So –bold:$false is valid, and   -bold still turns bold on.  But checking the value $bold will return false if the parameter was omitted or set to false explicitly.

So now I have 3 cases where I need to ask “was this parameter specified, or has it defaulted to being…”; and that’s what $PSBoundParameters is for – it’s a dictionary with the names and values that were passed into the command. Not values set as a parameter default, not parameters changed as the function proceeds; bound parameters. So I changed my code to this

if ($PSBoundParameters.ContainsKey('Bold')    ) {$row.Bold      = [boolean]$bold}
if ($PSBoundParameters.ContainsKey('Height')  ) {$row.Height    = $Height       }
if ($PSBoundParameters.ContainsKey(Alignment')) {$row.Alignment = $Alignment    }

So now if the parameters are given a value, whether it is false, zero, or an empty string, the property will be set. There is one last thing to do, and this is why I said it was the least inelegant solution, because –switch:$false is a rarely-used syntax, it’s reasonable to assume people won’t expect that to be the way to say “remove bold” so the parameter help needs to be updated to read “Make text bold; use -Bold:$false to remove bold”.

* If “Do or Do not” sounds familiar, Yoda would tell you that using the –Force switch is something you can not do in a try{}/ catch{} construct.

July 29, 2018

Windows Indexing not indexing properly ? Try this.

Filed under: Desktop Productivity — jamesone111 @ 10:54 am

A few weeks ago now my Surface Book died. It powered off in the middle of something; reluctantly powered on again and eventually went off and no known trick would get it to come back on; back it went and after a short delay a replacement (MK I) surface book arrived. A battery report showed the batteries were on their first charge cycle and it looks brand new. Nice.
A lot of my work is sync’d to one drive, and  quietly made its own way back but music and nearly  200GB of files in my Pictures directory, and a few other files aren’t. So they had to be copied back from my external hard disk. Everything seemed good, but a few funnies started to appear; the groove music app thought most of my music was on an unknown album by an unknown artist. Grouping pictures by tag didn’t work. Searches for pictures and documents didn’t find them even though when I picked through the directories they were there. It all pointed to something wrong with the index. So off to indexing options, and click Advanced and then Reset and wait for the index to chomp through all those files and … no change. 

imageSearch on-line and everything says “Re-build the index”; yes, thanks, done that – in fact I’d done it more than once. I’ve enough experience of the index to know that resetting it is usually the answer (“Wait” is sometimes the answer too, reset is good for the impatient). Some things say check that the directory you want is on the the list of directories to index. And yes, users is on the list and all the files are under there.
I’d put the problem to one side when I happened to click the advanced button on the properties of a directory, and there is an option which I had long forgotten:
“Allow files in this folder to have contents indexed”

Ah … now … what if copying files back from the hard disk had cleared that attribute ? So uncheck it, click OK, and Apply, and choose “Apply changes to this folder only”. Then go back, check the box , click OK, and this time say “Apply changes to this folder, subfolders and files” now force a re-index, searches work. Reset groove (from Windows Settings, Apps) and let it rediscover and artists and albums are back. So if the full text meta-data inside the file (as opposed Dates, size and file name) aren’t being indexed, this is worth a try .

May 31, 2018

More tricks with PowerShell and Excel

Filed under: Office,Powershell — jamesone111 @ 6:25 am

I’ve already written about Doug Finke’s ImportExcel module – for example, this post from last year covers

  • Basic exporting (use where-object to reduce the number of rows , select-object to remove columns that aren’t needed)
  • Using -ClearSheet to remove old data, –Autosize to get the column-widths right, setting titles, freezing panes and applying filters, creating tables
  • Setting formats and conditional format      
  • In this post I want to round up a few other things I commonly use.

    Any custom work after the export means asking Export-Excel to pass through the unsaved Excel Package object like this

    $xl = Get-WmiObject -Class win32_logicaldisk | select -Property DeviceId,VolumeName, Size,Freespace |
               Export-Excel -Path "$env:computerName.xlsx" -WorkSheetname Volumes –PassThru

    Then we can set about making modifications to the sheet. I can keep referring to it via the Excel package object, but it’s easier to use a variable. 
    $Sheet = $xl.Workbook.Worksheets["Volumes"]

    Then I can start applying formatting, or adding extra information to the file
    Set-Format -WorkSheet $sheet -Range "C:D" -NumberFormat "0,000"
    Set-Column -Worksheet $sheet -Column 5
    -Heading "PercentageFree" -Value {"=D$row/C$row"} -NumberFormat "0%" 

    I talked about Set-column in another post. Sometimes though, the data isn’t a natural row or column and the only way to do things is by “Poking” individual cells, like this

        
    $sheet.Cells["G2"].value = "Collected on"
    $sheet.Cells["G3"].value = [datetime]::Today
    $sheet.Cells["G3"].Style.Numberformat.Format =
     "mm-dd-yy"
    $sheet.Cells.AutoFitColumns()
    Close-ExcelPackage $xl –Show

    Sharp-eyed readers will see that the date format appears to be “Least-significant-in-the-middle” which is only used by one country – and not the one where I live. It turns out Excel tokenizes some formatsthis MSDN page explains and describes “number formats whose formatCode value is implied rather than explicitly saved in the file….. [some] can be interpreted differently, depending on the UI language”. In other words if you write “mm-dd-yy” or “m/d/yy h:mm” it will be translated into the local date or date time format. When Export-Excel encounters a date/time value it uses the second of these; and yes, the first one does use hyphens and the second does use slashes. My to-do list includes adding an argument completer for Set-Format so that it proposes these formats.

    Since the columns change their widths during these steps I only auto-size them when I’ve finished setting their data and formats. So now I have the first page in the audit workbook for my computer

    image

    Of course there times when we don’t want a book per computer with each aspect on it’s own sheet, but we want book for each aspect with a page per computer.
    If we want to copy a sheet from one workbook to another, we could read the data and write it back out like this

    Import-Excel -Path "$env:COMPUTERNAME.xlsx" -WorksheetName "volumes" | 
         Export-Excel
    -Path "volumes.xlsx" -WorkSheetname $env:COMPUTERNAME

    but this strips off all the formatting and loses the formulas  – however the Workbook object offers a better way, we can get the Excel package for an existing file with
    $xl1 = Open-ExcelPackage -path "$env:COMPUTERNAME.xlsx"

    and create a new file and get the Package object for it with 
    $xl2 = Export-Excel -Path "volumes.xlsx" -PassThru

    (if the file exists we can use Open-ExcelPackage). The worksheets collection has an add method which allows you to specify an existing sheet as the basis of the new one, so we can call that, remove the default sheet that export created, and close the files (saving and loading in Excel, or not, as required) 

    $newSheet = $xl2.Workbook.Worksheets.Add($env:COMPUTERNAME, ($xl1.Workbook.Worksheets["Volumes"]))
    $xl2.Workbook.Worksheets.Delete("Sheet1")
    Close-ExcelPackage $xl2 -show
    Close-ExcelPackage $xl1 –NoSave

    The new workbook looks the same (formatting has been preserved -  although I have found it doesn’t like conditional formatting) but the file name and sheet name have switched places.

    image

    Recently I’ve found that I want the equivalent of selecting “Transpose” in Excel’s paste-special dialog- take an object with many properties and instead of exporting it so it runs over many columns in making a two-column list of Property name and value
    For example
    $x = Get-WmiObject win32_computersystem  | Select-Object -Property Caption,Domain,Manufacturer,
                                Model, TotalPhysicalMemory, NumberOfProcessors, NumberOfLogicalProcessors

    $x.psobject.Properties | Select-Object -Property name,value |
        Export-Excel -Path "$env:COMPUTERNAME.xlsx" -WorkSheetname General -NoHeader -AutoSize –Show

    imagec

    When I do this i a real script I use the –passthru swtich and apply some formatting

    $ws    = $excel.Workbook.Worksheets["General"]
    $ws.Column(1).Width                     =  64
    $ws.Column(1).Style.VerticalAlignment   = "Center"
    $ws.Column(2).Width                     =  128
    $ws.Column(2).Style.HorizontalAlignment = "Left"
    $ws.Column(2).Style.WrapText            = $true

    Of course I could use Set-Format instead but sometimes the natural way is to refer to use .Cells[]  , .Row() or .Column().

    May 14, 2018

    A couple of easy boosts for PowerShell performance.

    Filed under: Powershell — jamesone111 @ 10:55 am

    At the recent PowerShell and Dev-ops summit I met Joshua King and went to his session – Whip Your Scripts into Shape: Optimizing PowerShell for Speed – (an area where I overestimated my knowledge) and it’s made me think about some other issues.  If you find this post interesting it’s a fair bet you’ll enjoy watching Joshua’s talk. There are a few of things to say before looking at a performance optimization which I added to my knowledge this week.

  • Because scripts can take longer to write than to run, we need to know when it is worth optimizing for speed. After all, if cut we the time from pressing return to the reappearance of the prompt from 1/2 second to 1/4 or even to 1/1000th second our reaction time is such that we don’t do the next thing we’re going to do any sooner. On the other hand if something takes 5 minutes to run (which might be the same command being called many times inside a script), giving minutes back is usable time.
  • Execution time varies with input – it often goes up with the square of the number of items being processed.  (Typically when the operation is in the form “For every item, look at [some subset of] all items”). So you might process 1,000 rows of data in half a second … but then someone takes your code and complains that their data take 5 minutes to process, because they’re working with many more rows. Knowing if you should optimize here isn’t straightforward  – most of the time doesn’t matter, but when it matters at all, it matters a lot.  You can discover if performance tails off badly at 10,000 or 1,000,000 rows but it isn’t easy to predict how many of any given size there will be and whether optimizing performance is time is well spent . If the problem happens at scale, then you might run sub-tasks in parallel (especially if each runs on a different computer), or change the way of working – for example this piece on hash tables is about avoiding the “look at every item” problem.
  • No one writes code to be slow. But the fast way might require something which is longer and/or harder to understand. If we want to write scripts which are reusable we might prefer tidy-but-slower over fast-but-incomprehensible. (All other things being equal we’d love the elegance of something tidy and fast, but a lot of us aren’t going to let the pursuit of that prevent us going home). 
    Something like $SetA | where {$_ –notIn $setB}  is easy to understand but if the sets are big enough it might need billions of comparisons, the work which gave rise to the hash tables piece  cut the number from billions to under a million (and meant that we could run the script multiple times per hour instead of once or twice in a day, so we could test it properly for the first time). But it takes a lot more to understand how it works.
  • One area from Joshua’s talk where the performance could be improved without adding complexity was reducing or eliminating the hit from using Pipelines; usually this doesn’t matter – in fact the convenience of being able to construct a bespoke command by piping cmdlets together was compelling before it was named “PowerShell”.  Consider these two scripts which time how long it takes to increment a counter a million times.

    $i  = 0 ; $j = 1..1000000 ;
    $sw = [System.Diagnostics.Stopwatch]::StartNew() ;
    $J | foreach {$i++ }  ;
    $sw.Stop() ; $sw.Elapsed.TotalMilliseconds

    $i  = 0 ; $j = 1..1000000 ;
    $sw = [System.Diagnostics.Stopwatch]::StartNew() ;
    foreach ($a in $j) {$i++ }  ;
    $sw.Stop() ; $sw.Elapsed.TotalMilliseconds

     The only thing which is different is the foreach – is it the alias for ForEach-Object, or is it a foreach statement . The logic hasn’t changed, and readability is pretty much the same; you might expect them to take roughly the same time to run … but they don’t: on my machine, using the statement is about 6 times faster than piping to the cmdlet.
    This is doing unrealistically simple work; replacing the two “ForEach” lines with

    $j | where {$_ % 486331 -eq 0}
    and
    $j.where(  {$_ % 486331 -eq 0} )

    does something more significant for each item and I find the pipeline version takes 3 times as long! And the performance improvement remains if the output of the .where() goes into a pipeline. I’ve written in the past that sometimes very long pipelines can be made easier to read by breaking them up (even though I have a dislike storing intermediate results), and it turns out we also can boost performance by doing that.

    Recently I found another change : if I define a function

    Function CanDivide {
    Param ($Dividend)
        $Dividend % 486331 -eq 0
    }
    and repeat the previous test with the command as
    $j.where( {CanDivide $_ } )

    People will separate roughly 50:50 into those who find the new version easier to understand, and those who say “I have to look somewhere else to see what ‘can divide’ does”. But is it faster or slower and by how much ? It’s worth verifying this for yourself, but my test said the function call makes the command slower by a factor of 6 or 7 times.  If a function is small, and/or is only called from one place, and/or is called many times to complete a piece of work then it may be better to ‘flatten’ the script. I’m in the “I don’t want to look somewhere else” camp so my bias is towards flattening code, but – like reducing the amount of piping – it might feel wrong for other people. It can make the difference between “fast enough”, and “not fast enough” without major changes to the logic.

    Next Page »

    Create a free website or blog at WordPress.com.